How to Add a Category in Shopify & Expert Tips for Beginners

Grouping your products into categories can improve the shopping experience and help customers find what they need more easily in your Shopify store. If you’re new to Shopify, you might be wondering how to create a category.
In this article, we will walk you through adding a category to your Shopify store.
What is a Shopify Category?
Categories are the largest groups of most objects based on similarity or specific criteria, and they can’t be larger. From categories, you can break them down into smaller groups. Shopify categories are divided into website categories (or collections) and product categories.
- Website categories (Collections): Help customers easily navigate through products.
- Product categories: Assist the Shopify platform in sorting and calculating automatically.
The table below compares Shopify categories and collections (website categories):
| Aspect | Product categories | Website categories |
|---|---|---|
| Method | Automatically group products based on factors like product type, vendor, or tags. | Group comparable products based on shared qualities, such as product type, brand, or price range. |
| Purpose | Assist Shopify in organizing and tracking your store's inventory and sales data, even if these categories are not visible to customers. | Help buyers quickly find what they're looking for. |
| Functionality | - Aid in tax collection by applying the appropriate tax rate based on the assigned category. - Provide a predefined product taxonomy with a hierarchical structure of categories and subcategories. |
- Display categories in your store's navigation menu that you, as the store owner, have defined and manage. - Can be tailored to your brand and the various product categories that your shop offers. |
To give you a clearer picture of these two definitions, let’s take a look at their examples in storefront.
Example of product categories

Example of collections

How to Add a Product Category in Shopify Dashboard
In this section, we’ll provide you with detailed instructions on how to add a new category to your Shopify store with 2 methods.
Method 1: Using Shopify Dashboard
1. Add a product category in Shopify
To add a category in Shopify for your products, follow these instructions:
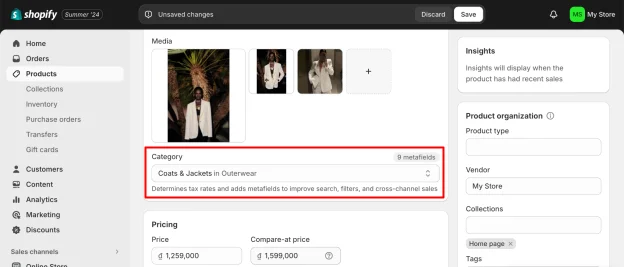
Step 1: Navigate to the Products section in your Shopify admin and select a product.
Step 2: Complete the following steps to create a category for your product.
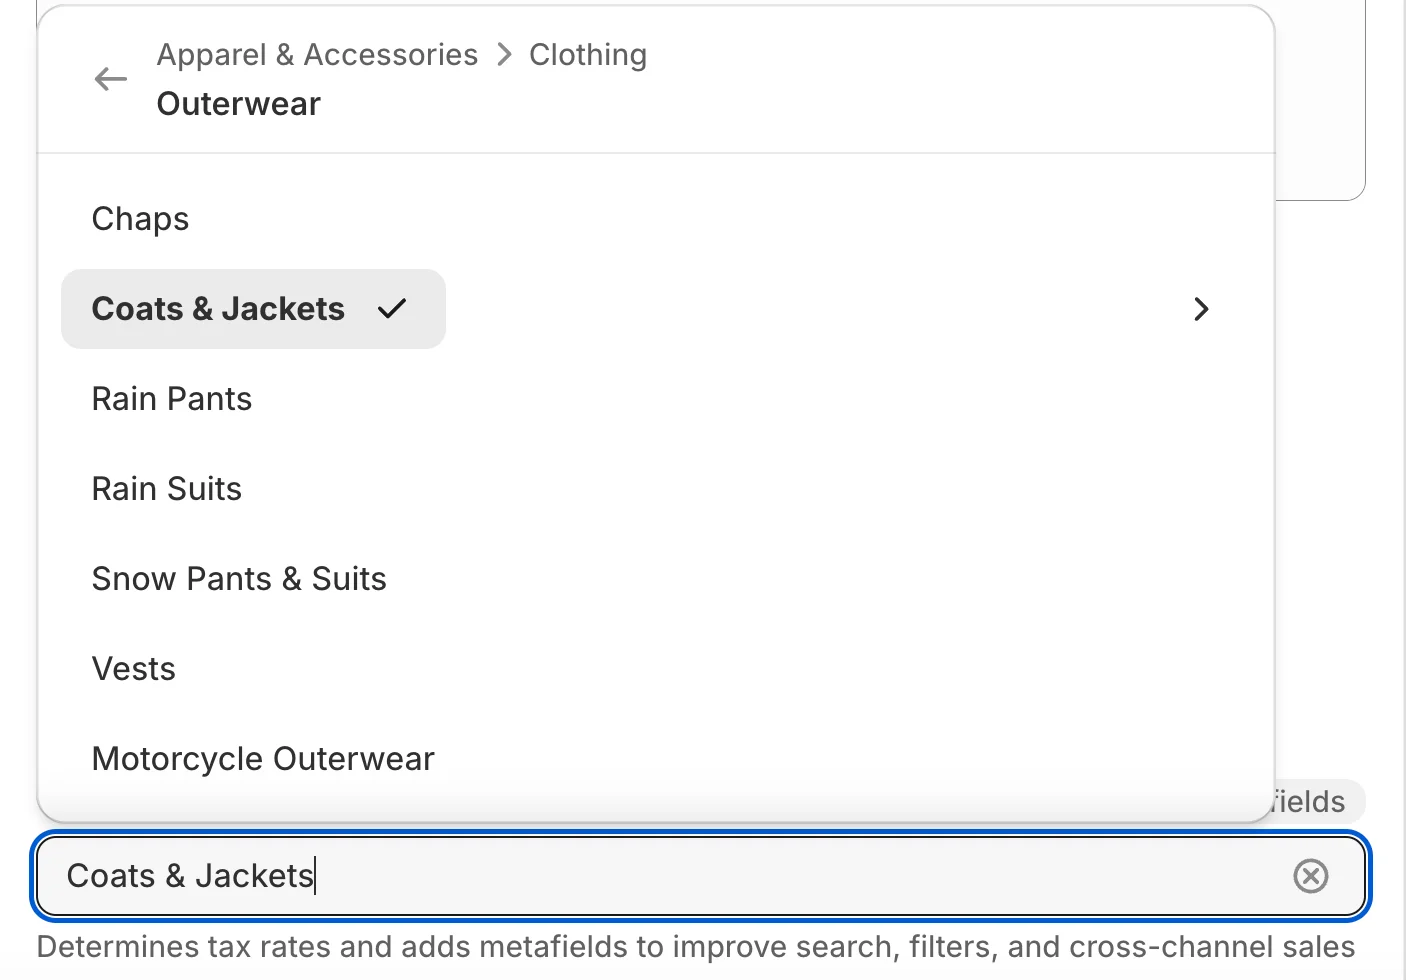
Type in the category of your product, then choose the most accurate result from the Shopify Product Category list. To find your product category, browse through all Shopify categories and subcategories.
Step 3: Save your changes.
2. Create a new Shopify product type
Adding product types in Shopify is similar to adding a product category. Here’s how to do it:
Step 1: Navigate to Products in your Shopify admin and select a product.
Step 2: In the Product Organization section, enter the Product Type field.
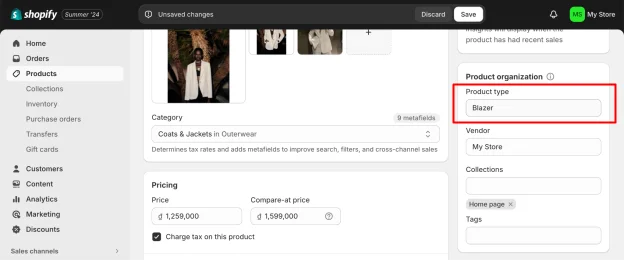
Step 3: Click Save.
3. Edit product categories in bulk
If you choose not to edit products individually, here are the steps for editing product categories in bulk:
Step 1: Click on Products. Select all the items you want to include in a category.
Step 2: Click on Bulk Edit.

Step 3: Make the necessary changes in the bulk edit view.
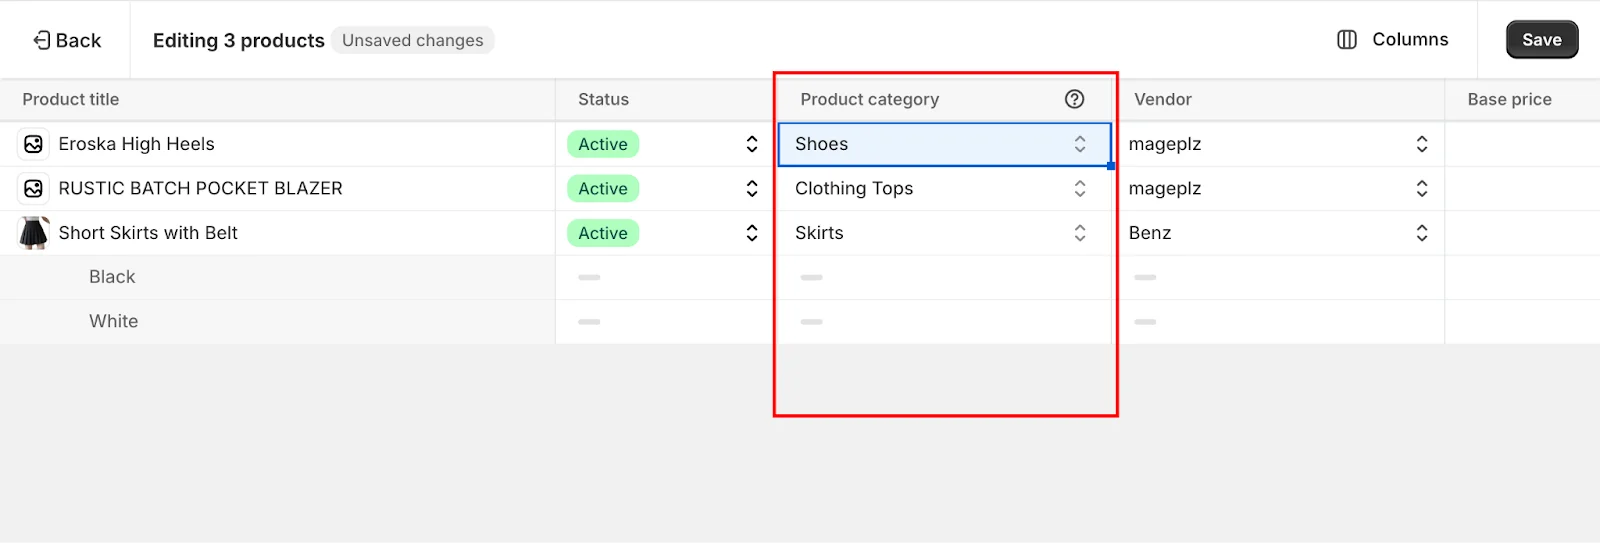
Step 4: Click Save.
Method 2: Import Categories in Shopify via a CVS File
This method is recommended for those with many products, as it allows you to import multiple products at once. Moreover, importing categories in bulk saves time and effort, ensures high accuracy, and simplifies managing large inventories.
Basic knowledge of Excel and HTML is needed to properly fill out all the product information.
Here are the step-by-step guidelines to import product categories:
Step 1: Prepare a CSV file
- Make a CSV file with your product information in it, including a column for the Product Category.
- Enter the ID or path of the product category in the Product Category column. (Note: The Shopify Product Taxonomy contains the ID and the path.)
- Save the file.

Step 2: Upload a CSV File
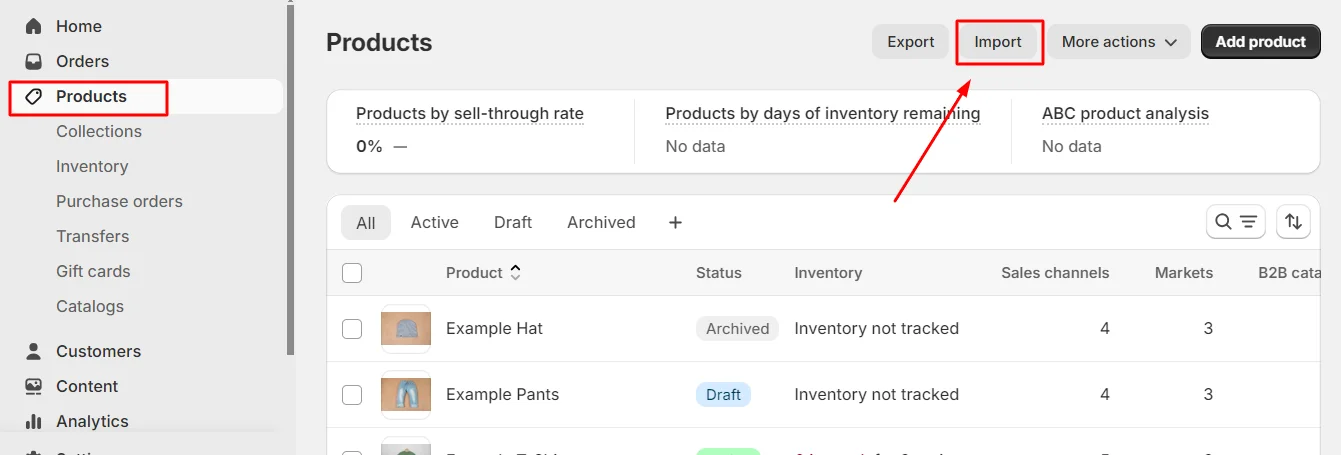
- In the Shopify admin, select Products.
- Click Import.
- Add the CSV file you want to submit.
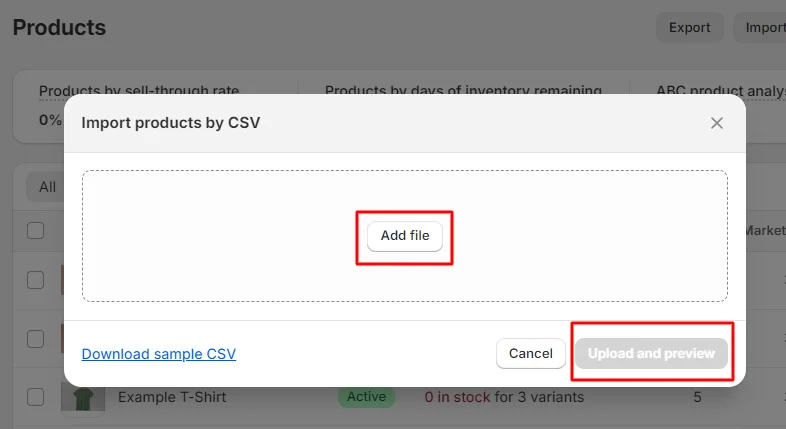
Step 3: Verify the import settings are accurate by clicking Upload and preview.
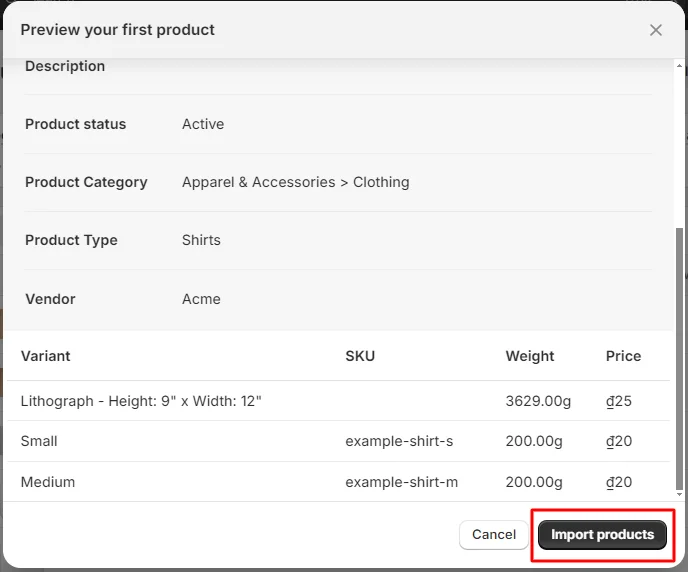
Step 4: Click Import products to add your products, Shopify categories, and subcategories.
Now you know how to add a category to Shopify for your products. The next section will explain how to add products to a collection in Shopify.
How to Add a Website Category (Collection) in Shopify?
Step 1: Log in to Your Shopify Account
First, log into your Shopify account to begin the process.
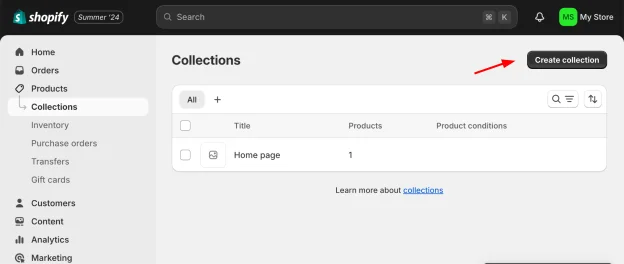
Step 2: Open the Collections Section
Navigate to the Collections section and choose Create Collection.
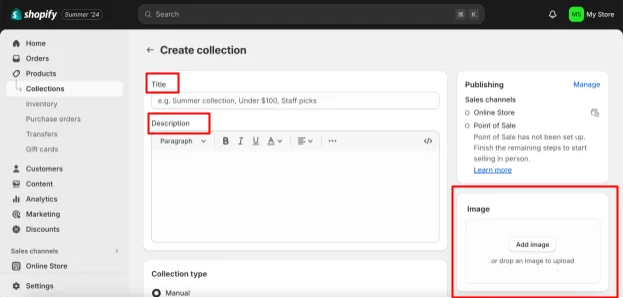
Step 3: Fill in Collection Details
Enter the details for your new collection. Here’s what you need to do:
- Define the Title for your collection.
- Enter a Description.
- Choose an image from your computer by clicking the Add Image button located under the Image section on the right side of the page.
Step 4: Select the Collection type
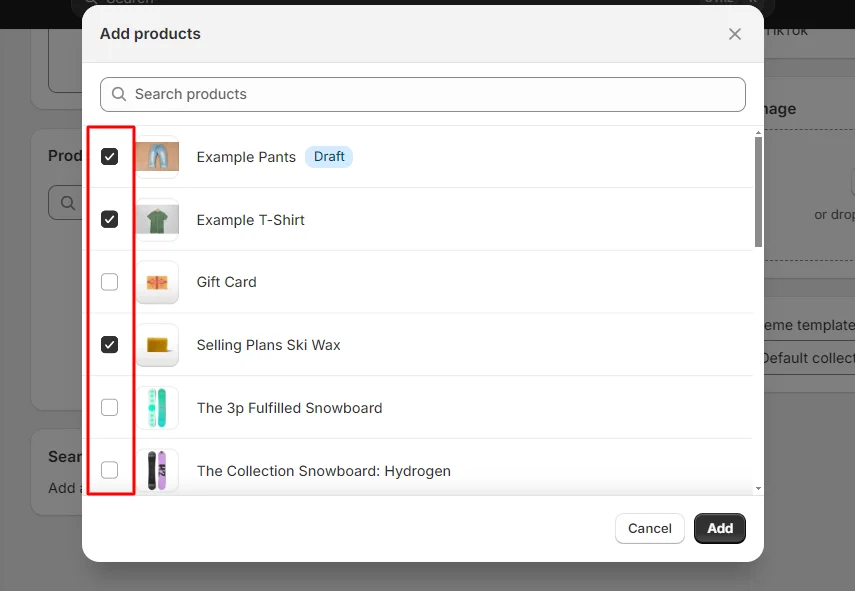
Choose one of the 2 options below and click Save to continue adding products to your new collection.

- Manual option: With this option, you have to manually add one by one product into the target collection.
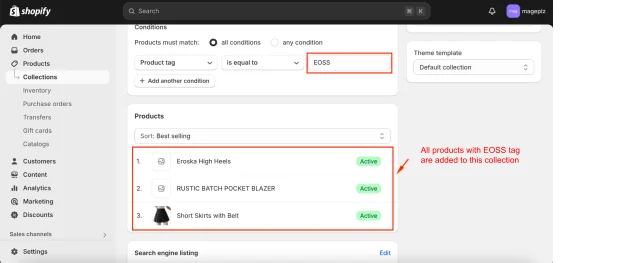
- Automated option: Automatically add products based on specified conditions. Select a criterion from the list, such as Product Title, Product Type, Product Category, etc., and then input the relevant details.
Step 5: Fill in Search Engine Fields
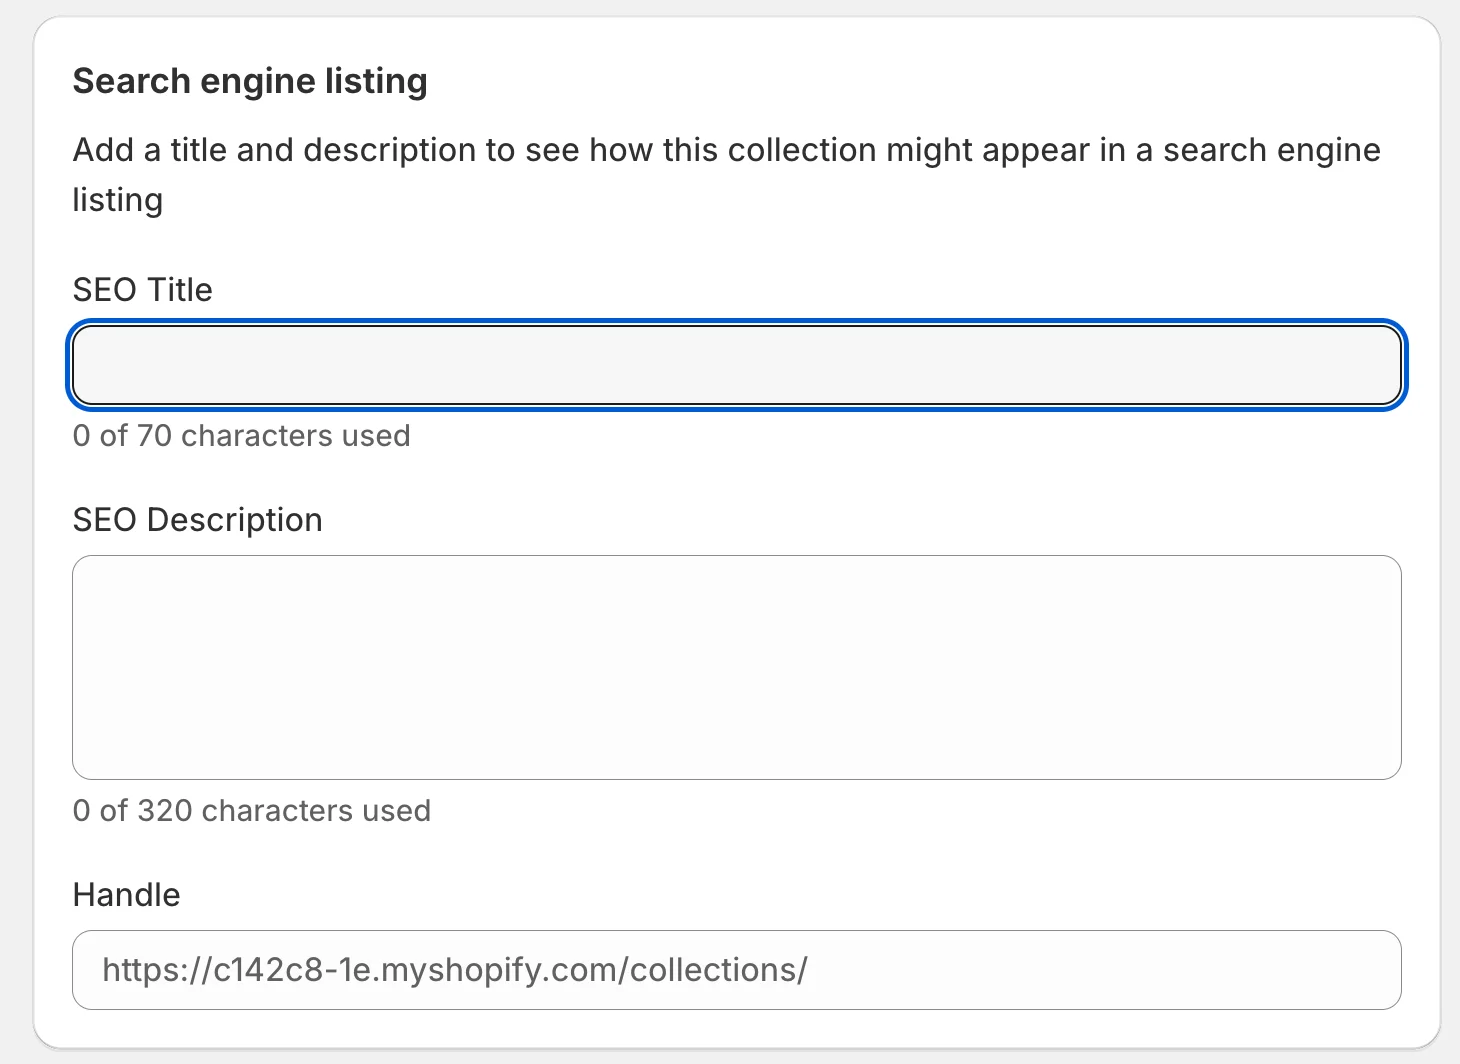
Review the SEO title, SEO description, and Handle fields, which are automatically generated based on your Collection details.
Note: You can edit the SEO title and SEO description, but avoid changing the Handle field.
Step 6: Choose Options in the Visibility Section
Set the new collection to be either visible or hidden in your store. You can also schedule a specific publish date if you want the collection to appear on your website at a later date.
Step 7: Save Collection settings
Finally, click Save.
Pro-Tips for Adding a Category in Shopify
Here are some tips to help you efficiently and effectively add categories in Shopify:
Product Categories:
- Verify tax and shipping estimates are accurate.
- Regularly review and update product categories to maintain their relevance and accuracy.
Web Categories:
- Create detailed and descriptive names for your categories.
- Design a clear and straightforward navigation structure for your storefront.
- Highlight key product collections or promotions.
- Utilize analytics to refine and enhance your categories.
- Take advantage of the Shopify Store app to manage your categories.
FAQs
How can I create categories and subcategories in Shopify?
- Go to Products and select a product.
- Choose a product category in the Category dropdown section.
- In the Product Organization section, you can add a product type, collections, and tags.
- Click Save to confirm your changes.
Are product categories available in Shopify?
Yes, Shopify provides a predefined list called the Shopify Product Taxonomy from which you can select product categories. These categories help filter and organize your product list.
Are Shopify collections the same as categories?
No, they serve different purposes:
- Categories: Used to organize products based on their presentation on the homepage.
- Collections: Group products based on themes or shared attributes.
How to add a product category to a Shopify menu?
- On the Navigation page, click the title of the menu you want to edit.
- Click Add menu item.
- Enter a name for the menu item, which can include emojis or special characters.
Conclusion
In conclusion, adding categories and collections to your Shopify store is essential for improving customer navigation and making it easier for them to find what they need. By following the steps outlined in this guide, you can efficiently organize your products, manage tax and shipping details, and enhance the overall shopping experience.
Whether you’re a beginner or looking to optimize your store, properly utilizing categories in Shopify will streamline your business operations and contribute to your store’s success.


![Top 20+ Must-have Shopify Apps for 2025 [Free & Paid] - Mageplaza](https://cdn2.mageplaza.com/media/blog/must-have-shopify-apps/top-must-have-shopify-apps.png)
![[2025 Updates] Top 10+ Upsell Apps for Shopify - Mageplaza](https://cdn2.mageplaza.com/media/blog/best-upsell-shopify-app/cover.png)