
How to create New Product block?
Table of Content
1. Role of New Products
When it comes to concerning how website managers can introduce their fresh new items inside their stock with everyone, we need to learn and manage how to find a way to notice and attract customers. Blog posts or emails are all effective ways, but on the other hands, this can’t be maintained in the long-term plan since internet life is always evolved into updating news and news everyday.
Mageplaza understands this enormous demand in Magento 2 and we would like to suggest a solution for your store.
1.1 Friendly New Product introduction
By installing a new product block at Category pages or Product pages, you can easily entice customers who missed your updating news in sent emails, subscribed posts or other means of communication, and friendly remind them to check your hottest products immediately. They may hesitate and likely don’t have tendency figuring it out if they see it one time only, but the second/third times will make a difference.
1.2 Optimized New Product block
Not only product’s image but also additional information can be introduced together to summary the fundamental sketch regarding the viewing product. For instance: Name of the product, brand name, pricing, ratings, etc.
Also, providing prepared essential piece of information can shorten the decision time of customers right the second they see the new product slider. Ask them less, customers will buy more.
2. How New Product blocks work
This slider can be installed effortlessly by Magento 2 Auto Related Products by collect a number of newest products in your catalog and feature them in the slider.
One of the most outstanding features is that you can display it in multiple pages thanks to the rule-based engine of Automatic Related Product extension, which means you won’t have to configure blocks one by one manually.
3. How to configure
3.1 Install Automatic Related Products extension
First, you will have to install the Automatic Related Product extension provided by Mageplaza to your Magento 2’s shop. There are 3 ways to install this plugin and all of them are easy to get ideas. Check this out?
Automatic Related Products for M2
Encourage customers to add more items to their cart by showing related products alongside their favorites
Check it out!The installation guide of Automatic Related Product can be traveled over this link.
3.2 Install a New Product block
Let’s take a closer look at this example which shows how to configure a new arrival block at Product detail pages. This new one will be displayed below the Magento’s Related Product block and visible with all my customer’s groups are General groups, Wholesales and Retailers.
Step 1: Create a new rule
You have to set a new rule to specify when this block is allowed to be displayed. To create a new Rule on Product Page, go to Mageplaza > Automatic Related Products > Manage Rules. In the Add Rule section, select Product Page.
A new Related Block Rule form will appear.
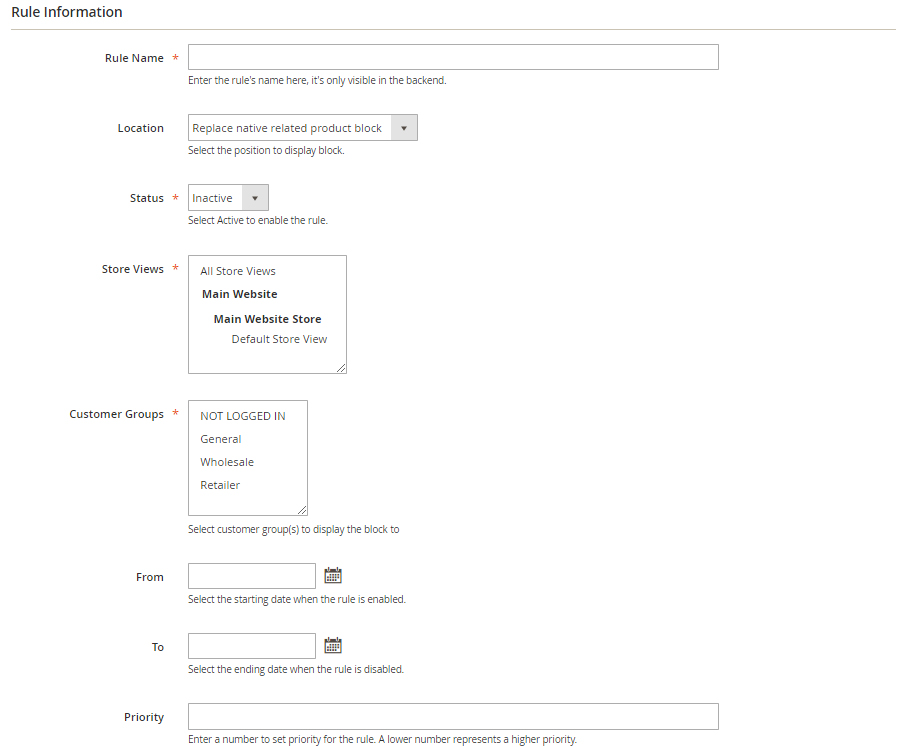
Step 2: Set Rule Information
 In the Rule Information form:
- Rule Name field is where you name the rule in the backend only. Here I’ll name it as “New Products - Bags - [New Arrivals]”
- Location is where you specify the block where it located. I’ll choose it as “After native related products”
- In the Status field: choose “Active” to enable the rule.
- In the Store View field you can select the store view where the rule applies on.
- In the Customer Group field: The rule is only applicable to customers who in the selected group. I selected all but “NOT LOGGED IN” customer group.
- In the From and To if you want to set the block in a period of time only, feel free to config this section.
- In the Priority field: This is the field where you enter the priority of the rule. I’ll enter 2 in this field.
Step 3: Set Rule’s Condition
- Applying “Attribute Set is Bag” rule means when visitors enter a page has attribute is Bag, it will be displayed. If you want another rules or even different one, play with it
- “New is Yes” means only newer products will be prioritized in displaying.
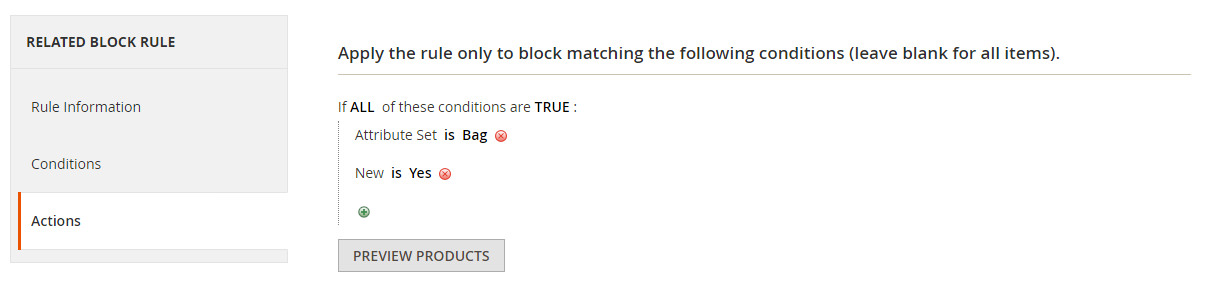 After saving the conditions, you’ll get a Product List. Click on
 Preview Productto display the products that meet the conditions.
Step 4: Set Rule’s Action
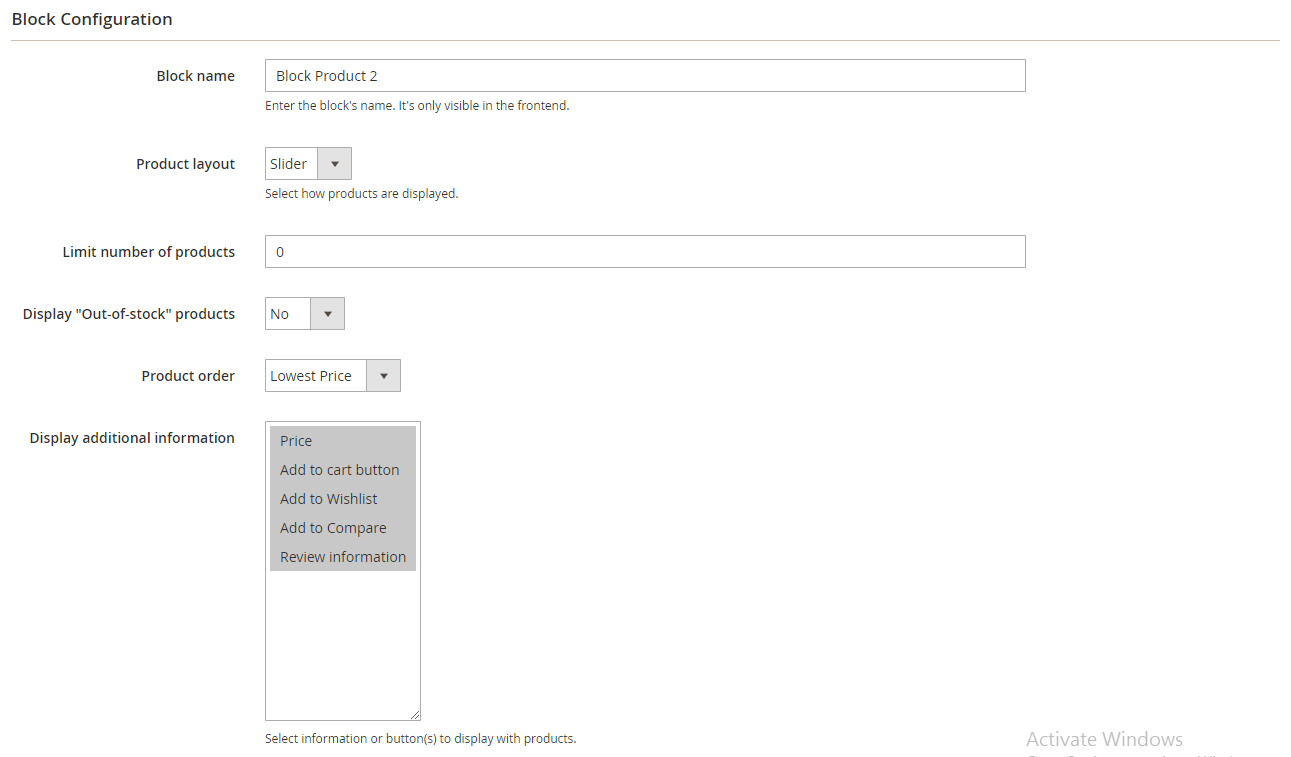
- The Block name field is where you can name the block which is displayed in the frontend. I name it as “New arrivals”
- In the Product Layout field: I choose “Slider” for its layout.
- In the Limit number of products field: Enter the maximum number of products displayed in a block. At this field, I set 8.
- In the Display “Out-of-stock” products field: select “No” to not display Out-of-Stock products in my Bestseller slider. It’s not a good impression if your customers see unavailable items being featured.
- In the Product order field: choose how to sort products in the block. Newest means newer products will be displayed first.
- In the Display additional information field: choose additional information or/and buttons displayed under products in the block, including Price, Review Information, Add to Cart buttons.
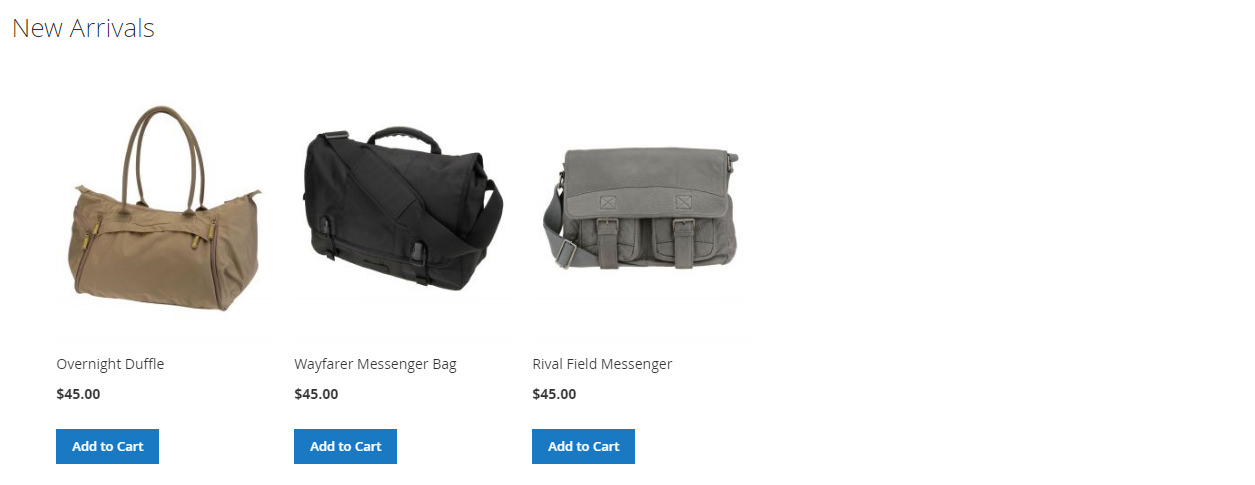
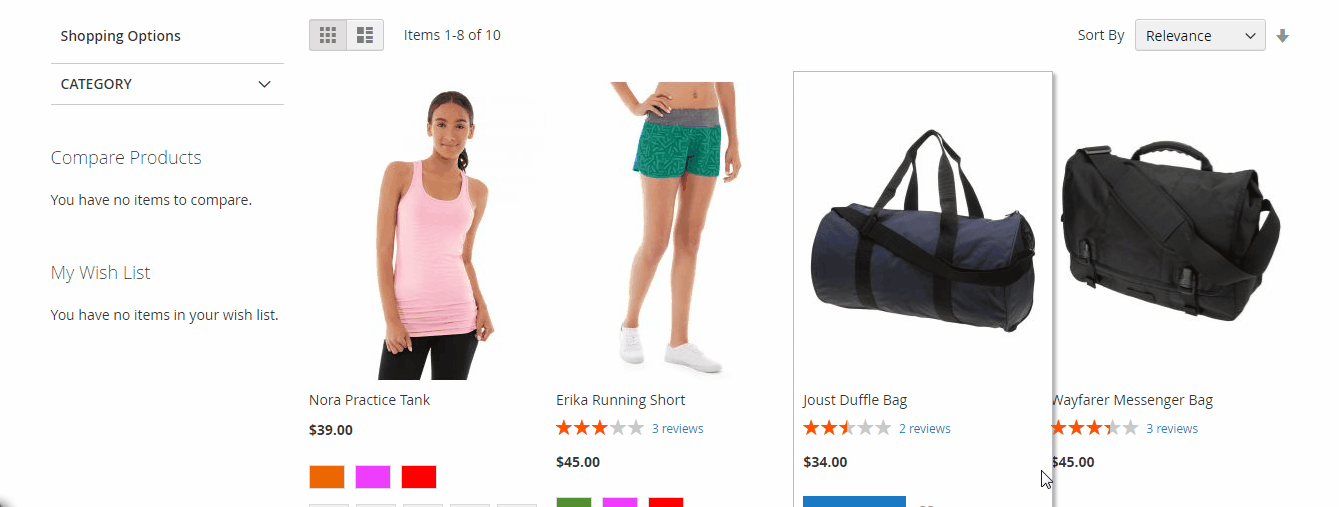
Step 5: Check result
Click Save Config to save all configured settings. Now back to the frontend and see the final outcome! When “Joust Duffle Bag” gets my attention, New Arrivals block is expose under the main content and now customer can pick all latest items up drop them to the carts quickly
Please take a quick glance the official page of the Automatic Related Products extension to discover more notable features!
Automatic Related Products for M2
Encourage customers to add more items to their cart by showing related products alongside their favorites
Check it out!