
With a big catalog of 224+ extensions for your online store
How to create a new Category in Magento 2
Creating a new category is the essential way to establish the logic flow for your management in the settings. Besides, customers will find the searching on your website professional instead of making the appearances of all items chaos.
The category is shown as a big tree with branches in the lower areas. The first levels are likely to be options displayed in the main menu. It is possible for you to create as many additional subcategories as you wish, as long as it follows the menu depth configuration. Each new category created by store owners will be assigned to a relevant parent category. Any unavailable category is hidden with gray. The position of category can be reordered when you drag, hold and drop it to the new location. Moreover, at the top of each category page, the category is marked by an ID number that is next to the category name.
In Magento 2, it is simple to create a new category as well as customize it as you expect.
Looking for
Customization & Development Services?
8+ years of experiences in e-commerce & Magento has prepared us for any challenges, so that we can lead you to your success.
Get free consultant
3 Steps to create a new category in Magento 2
How to create a new category in Magento 2 as following steps:
- Step 1: Generate a Category
- Step 2: Configure the General Information
- Step 3: Configure the Display Settings
Step 1: Generate a Category
- On the Admin Panel,
Product > Inventory > Categories -
In the category chart, assign to the relevant category that is right above the new category.
If there is any data which fits with the new category, you can assign to the Default Category.
- Click on the
Add Subcategory.
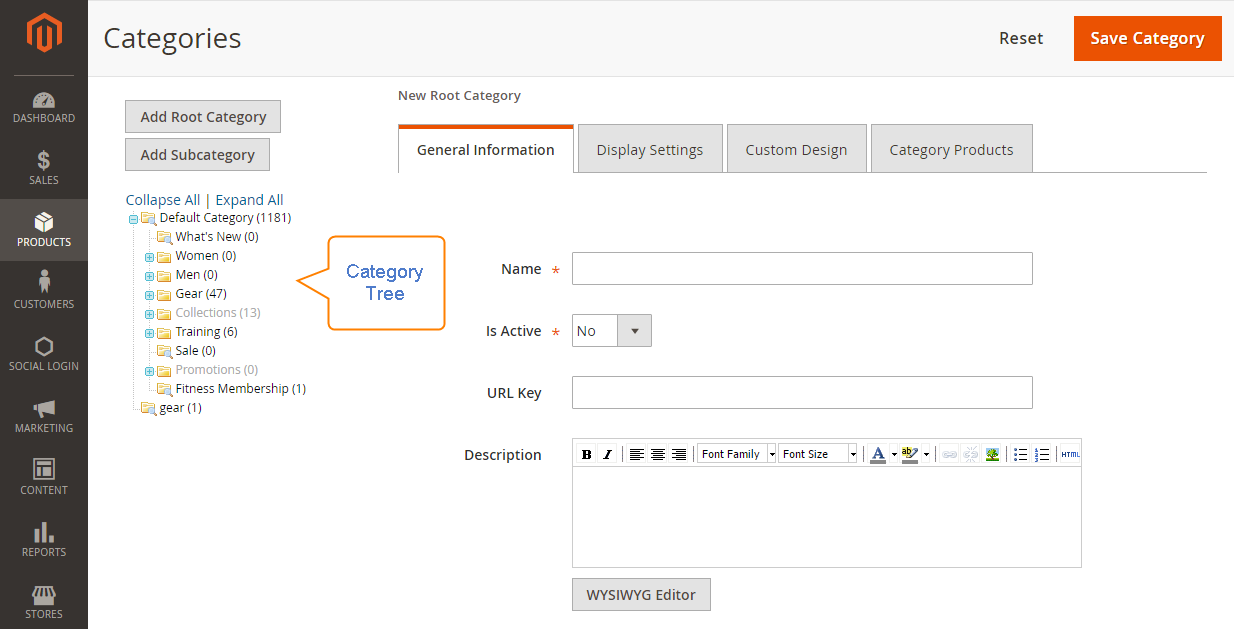
Step 2: Configure the General Information
- On the
General Informationsection,- Name for the new category.
- Enable the category by choosing Yes for
Is Activefield. - Create a
URL Keyfor yourself or it will be auto-created by the system.
- Write some descriptions about the category in the
Desscriptionbox. - Upload the
Imagefor the category if needed. - Enter the data:
Page Title,Meta Keywords,Meta Decriptionfor your SEO. - In the
Include in Navigation Menufield, choose Yes to show it on the Navigation Menu. - Click on the
Save Categorybutton.
Step 3: Configure the Display Settings
- Consider the
Display Modefrom these options: Products Only, Static Block Only or Static Block and Products. - Select a type of the static block in the
CMS Blockto show on the category page. Anchoris your agreement to show the “Filter by Attributes” of the Magento 2 layered navigation. If accepted, choose Yes.- If you don’t want to use config settings, ignore the checkbox and choose a feature (Name, Price) to reorder a list of product.
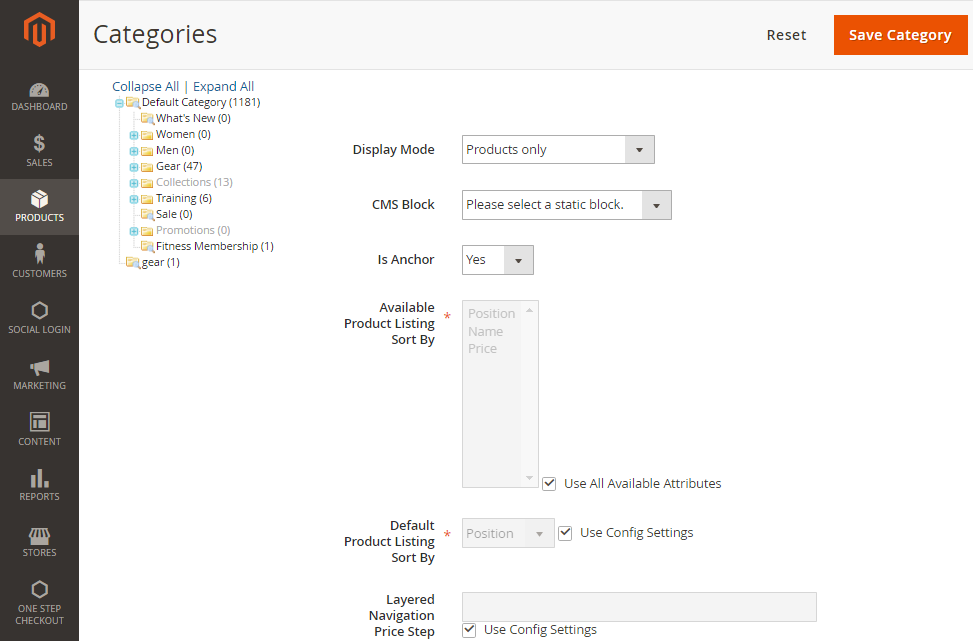
- Click on the
Save Categoryto complete.
Customizing Categories
A category configuration is customizable, so you can change its position in the category chart, edit, or even delete it quickly. However, it is important to examine how your modification will affect other parts. For instance, if there are some products in the category that you rename, the current product links are unavailable to access. Therefore, you should set your catalog to auto-generate a permanent redirect if there is any change as above. Or you can apply the URL Rewrite tool to navigate the visitors to a new link.
Rearrange a category
- On the Admin Panel,
Product > Inventory > Categories - In the category chart, click on the needed category and drag-drop it to the new parent category. The new structure of category will be auto-saved.
Eliminate a category
- From the category chart, consider the category you want to eliminate.
A eliminated category never comeback, so be careful to select the right category.
- Click on the
Delete Category, thenOkto verify.
The bottom line
Creating new categories is necessary to guide customers better when it comes to searching for particular items. Hence, a clear layered navigation can enhance customers’ experience and increase conversions greatly. You can use Mageplaza Layered Navigation to create filtering options in Magento 2 logically for your store. If you need more assistance, please comment below or contact us.
Related Post

Looking for
Customization & Development Services?
8+ years of experiences in e-commerce & Magento has prepared us for any challenges, so that we can lead you to your success.
Get free consultant
Recent Tutorials

Change Store Email Addresses

Fix Magento 2 'Invalid Form Key. Please refresh the page'

Magento 2 Search Settings: Default Magento vs Mageplaza AJAX Search
Explore Our Products:
People also searched for
- how to add category in magento 2
- how to create category in magento 2
- magento 2 add category
- magento 2 create category
- magento 2 categories
- how to create custom category page in magento 2
- magento 2 category page
- magento 2 category
- magento category
- magento 2 get category tree by id
- magento categories
- categories magento
- what is new in magento 2
- magento 2 add product to category
- magento 2 show categories on homepage
- magento category management
- magento 2 category tree
- magento 2 product categories
- magento 2 sales category
- magento 2 custom category page
- magento 2 category image
- magento 2 delete category
- how to create a category
- magento 2 virtual category
- magento 2 category display settings
- 2.3.x, 2.4.x
Stay in the know
Get special offers on the latest news from Mageplaza.
Earn $10 in reward now!


