
With a big catalog of 224+ extensions for your online store
How to Configure UPS Carrier in Magento 2
Configuring United Parcel Service (UPS) Carrier will help you associate any addresses in the domestic event or international. The number of countries that UPS shipping method supports by land and air is greater than 220 countries, so it is flexible to deliver goods.
Choosing a shipping carrier like UPS for your business is one of the first steps to reach more customers from all over the world and optimize your delivery service. And because UPS is a well-known company with a tested operating system, it also makes customers trust your store more.
Check out this post to see what credentials you need to connect your Magento 2 store to the UPS server to correlate any address you want. Also, we will guide you in details about other methods in the next topics, including USPS, FedEx, and DHL.
Learn how to add a new carrier in Magento 2
5 Steps to Configure UPS Carrier in Magento 2
- Step 1: Create a UPS Shipping account
- Step 2: Apply UPS
- Step 3: Setup the Container Description
- Step 4: Setup Handling Fees
- Step 5: Assign Allowed Methods and Applicable Countries
Step 1: Create a UPS Shipping account
Must create a UPS Shipping account firstly before configuring this shipping method.
Step 2: Apply UPS
- On the Admin Panel,
Stores > Settings > Configurations. - On the left panel, under
Sales, selectShipping Method. - Open the UPS section
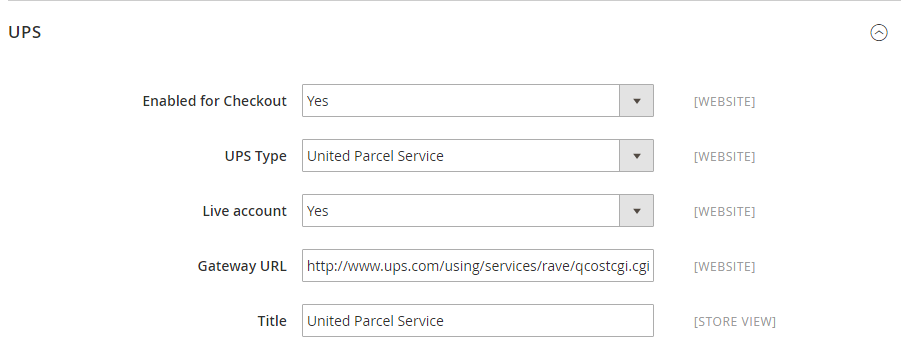
- Accept to enable UPS method by choosing Yes in the Enabled for Checkout field.
- If you set the
UPS Typeto “United Parcel Service”, you need to continue:- In the
Live Accountfield, choose one of the options:- “Yes” - if you want to run UPS in production mode and suggest the UPS as a shipping method for your customers.
- “No” - if you want UPS to run in only tet mode.
- Enter
Gateway URLto calculate the UPS shipping rate. The default is ready to use, and doesn’t need to change.
- In the
-
If you set the
UPS Typeto “United Parcel Service XML” -
To configure shipping labels, UPS Type must be set to “United Parcel XML”.
- Complete UPS XML account information: Access License Number, Password, and User ID.
- Allow sending data to the UPS shipping system by setting Live for the
Mode. - Verify the Gateway XML URL if you want to send requests by XML file.
- Choose the
Origin of the Shipmentthat is the region the shipment initiates. - Choose Yes for
Enable Negotiated Ratesif you create special rates with UPS. Then it is required to enter 6-character in theShipper Numberfield.
- Enter the
Titlefor the name of the shipping method that is shown during the checkout process. If it’s omitted, the default title - “United Parcel Service” is enabled.
Step 3: Setup the Container Description
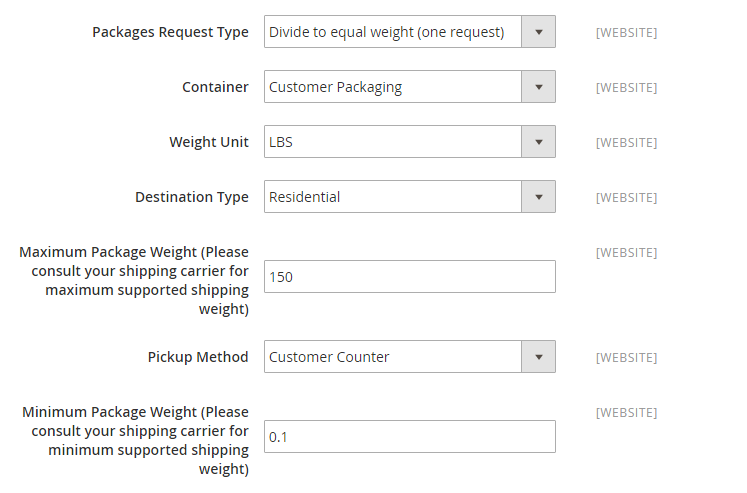
- Choose the
Packages Request Type: “Use origin weight (few requests)” or “Divide to equal weight (one request)” - Set the
Containerto the typical packaging type for the shipment. - Set the
Weight Unitto “LBS” or “KGS”. - Select the
Destination Type:- “Residential” - Most of your shipments are business to consumer (B2C)
- “Commercial” - Most of your shipments are business to business (B2B)
- Insert the number of the
Maximum Package Weightin the carrier. - Set the Pick Method to the available options: “Regular Daily Pickup”, “On Call Air”, “One Time Pickup”, “Letter Center”, and “Customer Counter”.
- Insert the number of the
Minimum Package Weightin the carrier.
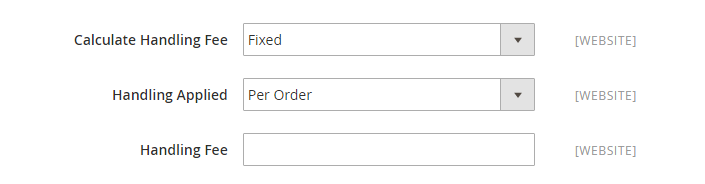
Step 4: Setup Handling Fees
- Set
Calculate Handling Feeto “Fixed” or “Percent”. - In the
Handling Appliedfield, allow specifying how to calculate the handling fee. - Insert the amount of
Handling Fee.
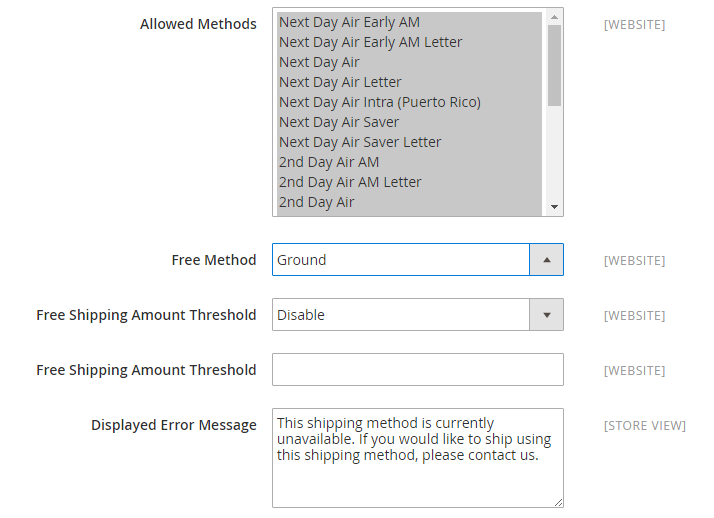
Step 5: Assign Allowed Methods and Applicable Countries
- Choose the UPS method offered to your customers from the
Allowed Methodlist. - In the
Free Methodfield, select the UPS service you want to apply free shipping for. - Enter an error message in the
Displayed Error Messagebox that will appear if UPS Shipping is not available.
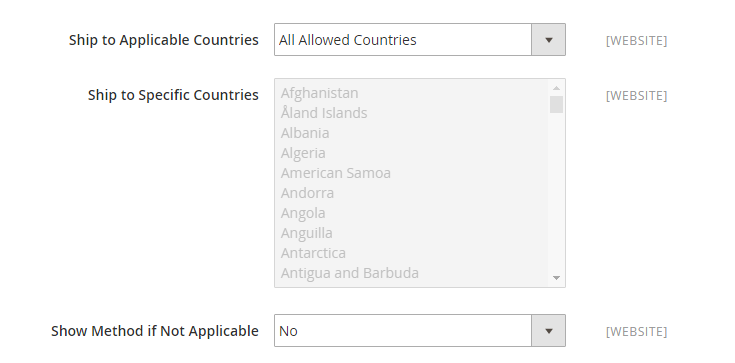
- Set
Ship to Applicable Countriesto one of two options:- All Allowed Countries : UPS Shipping is supported for every country.
- Specific Countries: UPS Shipping is only supported for selected countries.
- Set
Show Method if Not Applicableto Yes if you want to show UPS Shipping all time.
- To create a log file with the details of UPS shipments, set
Debugto “Yes”. - Set the
Sort Orderon the Shipping Method on the checkout page.

Save Configto finish.
Final words
UPS Carrier in Magento 2, together with USPS, FedEx, and DHL, are common choices of stores when it comes to shipping carriers, due to their popularity and wide delivery networks. If you want to attract new customers and expand your business with a professional image, consider these carriers. If you have any queries, don’t hesitate reaching out to us in the comment section.
Explore Mageplaza Shipping Suite
Related topics

Looking for
Customization & Development Services?
8+ years of experiences in e-commerce & Magento has prepared us for any challenges, so that we can lead you to your success.
Get free consultant
Recent Tutorials

Change Store Email Addresses

Fix Magento 2 'Invalid Form Key. Please refresh the page'

Magento 2 Search Settings: Default Magento vs Mageplaza AJAX Search
Explore Our Products:
People also searched for
- magento 2 ups
- ups magento 2
- magento 2 ups shipping
- magento 2 ups shipping not working
- magento ups shipping method not working
- magento ups
- ups magento
- magento ups shipping
- magento ups integration
- magento shipping account
- magento and ups
- magento ups worldship integration
- how to set up a ups
- ups carrier
- ups worldship magento
- magento ups shipping not working
- ups carrier setup
- ups shipping method
- ups shipping system
- magento ups worldship
- 2.3.x, 2.4.x
Stay in the know
Get special offers on the latest news from Mageplaza.
Earn $10 in reward now!


