
With a big catalog of 224+ extensions for your online store
How to Configure Payment Methods in Magento 2
Customers have their own preferences when it comes to payment methods, either due to convenience, security, or demographic factors. To answer this need, online stores need to offer different payment methods so that customers can choose whichever one they feel most comfortable with.
In this tutorial, we will show you how to configure default Payment Methods in Magento 2, including Check Money Order, Bank Transfer, Cash On Delivery, Purchase Order, Zero Subtotal Checkout , PayPal Express Checkout, Authorize.Net Direct Post and the latest one Braintree. The difference between Magento 2.0 and Magento 2.1 and above will also be shown in detail, if any.
Discover Mageplaza Payment Suite
How to Configure Payment Methods in Magento 2
- 1. Configure Braintree Payment Method
- 2. Configure PayPal Express Checkout Payment Method
- 3. Configure Bank Transfer Payment Method
- 4. Configure Cash On Delivery Payment Method
- 5. Configure Check Money Order Payment Method
- 6. Configure Purchase Order Payment Method
- 7. Configure Zero Subtotal Checkout Payment Method
- 8. Configure Authorize.Net Direct Post
1. Configure Braintree Payment Method
Braintree is a full-stack payment platform which allows your customers to check out by accessing credit and debit cards, PayPal, Apple Pay, Android Pay, Venmo, Bitcoin, and more. With the Braintree platform, you can easily accept payment from app or website. Notice that Braintree Payment Method can only be used with your store only when Magento Secure Payment Bridge is enabled and configured correctly. Moreover, though it is announced that Braintree can be used for all kinds of organization, there are still some types of business which are not supported and Braintree is only available for merchants from eight countries: United States, Canada, Australia, Europe, Singapore, Hong Kong, Malaysia, and New Zealand. In short, to set the Braintree payment method in your Magento store, you may want to find more details about Braintree and their acceptable use policy at their site before starting the configuration.
6 Steps to Configure Braintree Payment Method in Magento 2
- Step 1: Start the Braintree Payment Method Configuration
- Step 2: Set options for Basic Settings
- Step 3: Set options for Advanced Settings
- Step 4: Set options for Country Specific Settings
- Step 5: Set options for PayPal through Braintree Settings
- Step 6: Set options for 3D Verification Settings
Step 1: Start the Braintree Payment Method Configuration
- On the Admin sidebar, choose Stores > Settings > Configuration.
- In the panel on the left, click
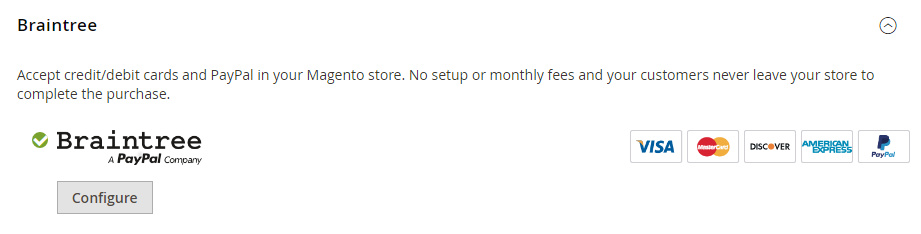
Sales > Payment Methods. - Click to expand the
Braintreesection then click on theConfigurebutton to start the configuration.
Step 2: Set options for Basic Braintree Settings
- In the
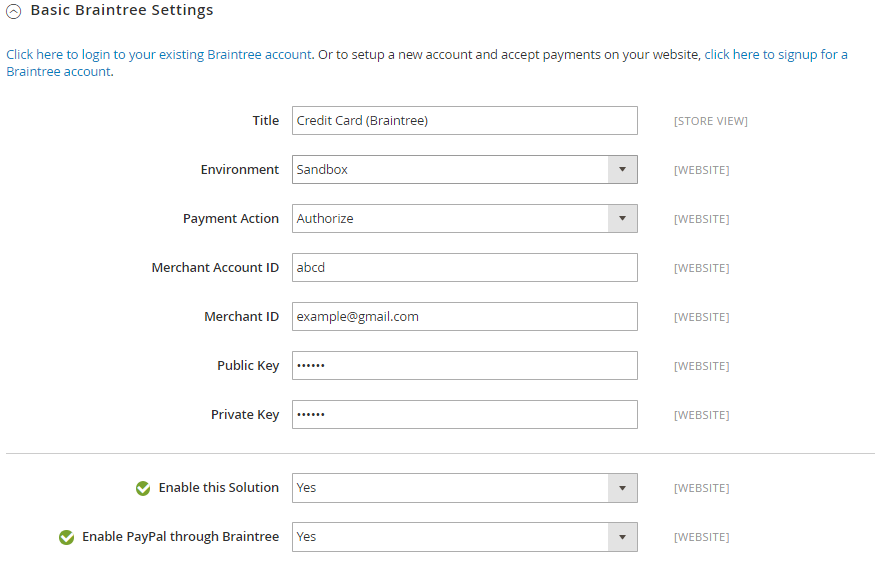
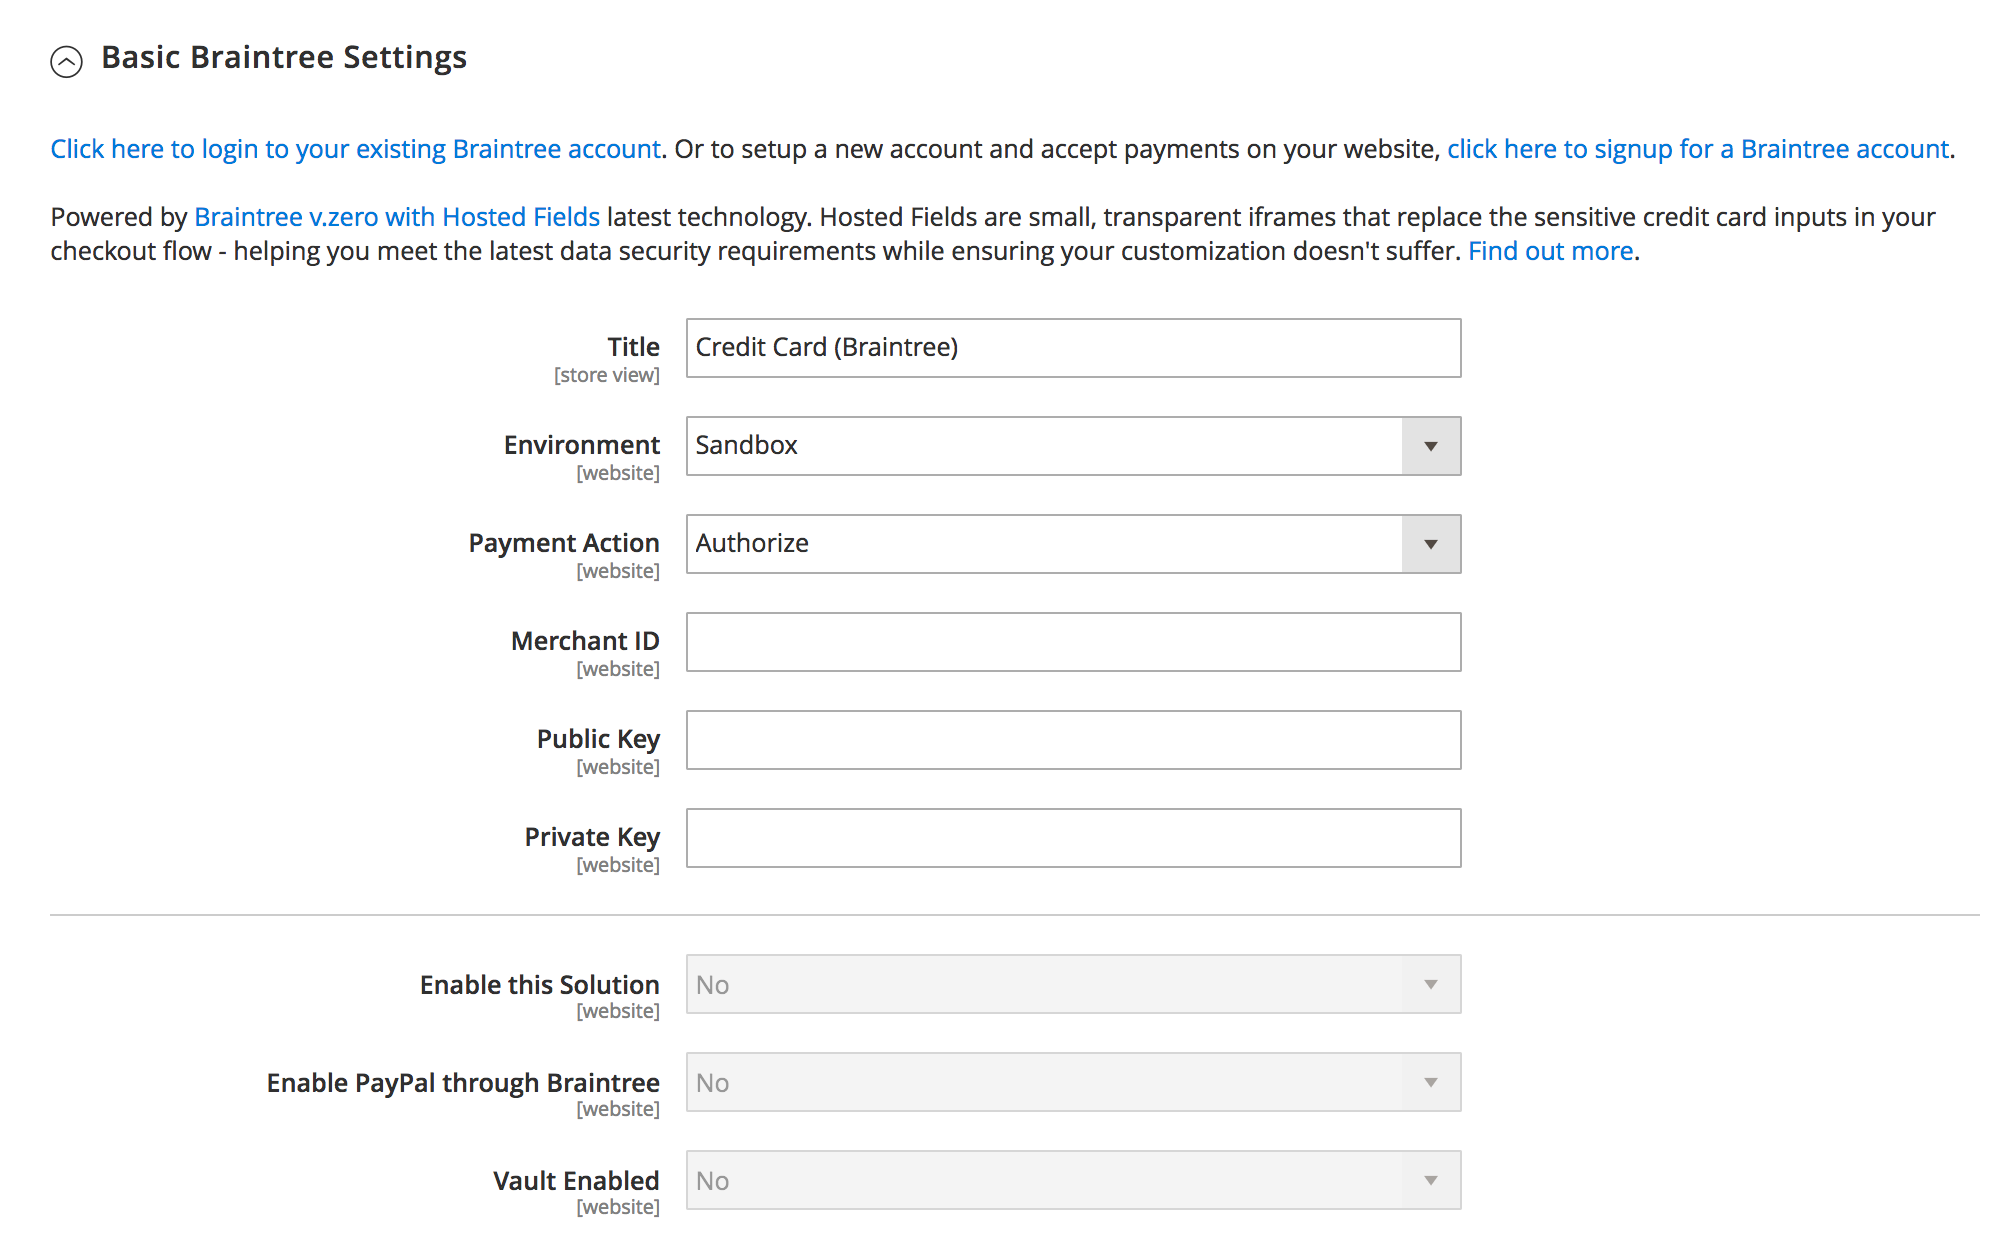
Basic Braintree Settingssection, go to Braintree Payments to log in or sign up for a new account or click onClick here to login to your existing Braintree accountOrclick here to signup for a Braintree accountand get your credentials. - In the
Titlefield, enter a new title or leave the default ofCredit Card (Braintree). - In the
Environmentfield, setSandboxto configure in the test environment or setProductionwhen you are ready to go live. - In the
Payment Actionfield, selectAuthorize Onlyto approve the purchase, but put a hold on the funds to wait for being captured by the merchant orAuthorize and Captureto imply that the purchase is already authorized and can be withdrawn from the customer’s account at once. - In the
Merchant Account ID,Merchant ID,Public KeyandPrivate Keyfields, Enter the credentials from your Braintree account. - Set
Enable this SolutiontoYesto activate the Braintree payment method. - Set
Enable PayPal through BraintreetoYesto include PayPal as a payment option with Braintree.
Magento 2.0
Magento 2.1
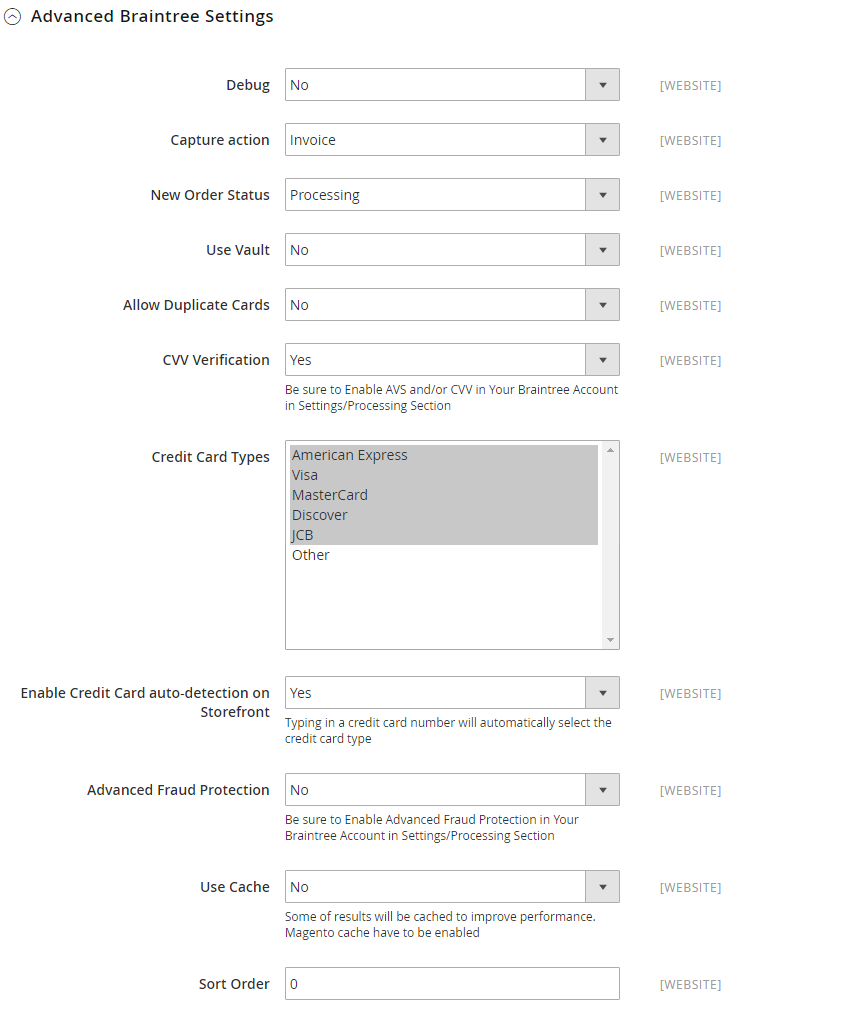
Step 3: Set options for Advanced Braintree Settings
- Set
DebugtoYesto save a log file of interactions between your store and Braintree. - In the
Capture actionfield, chooseInvoiceto create an invoice when the payment is captured orShipmentto create invoice and shipment record when the payment is captured and change the status of the order toAuthorized. - In the
New Order Statusfield, setProcessingorSuspected Fraud. - Set Use Vault to
Yesto store customer credit card information in the Braintree vault. - The
Allow Duplicate Cardsfield is set toNoby default. You can change this setting at your discretion. - Set
CVV VerificationtoYesto require customers to provide the 3-digit security code from the back of a credit card. If you want to use CVV verification, make sure to enable AVS and/or CVV in the Settings/Processing section of your Braintree account. - In the
Credit Card Typeslist, choose the types of the credit card which are accepted by your store as payment through Braintree. - Set
Enable Credit Card auto-detection on StorefronttoYesto detect the credit card type when the customer enters the number. - Set
Advanced Fraud ProtectiontoYesto apply Braintree fraud protection to transactions. Make sure that Advanced Fraud Protection is enabled in the Settings/Protection section of your account. - Set Use Cache to
Yesto improve performance by caching some results. Notice that the Magento cache must be is enabled to use the cache with Braintree. - In the
Sort Orderfield, enter a number to determine the position of Braintree Payment Method in the list of payment methods that is shown on the checkout page (start from 0).
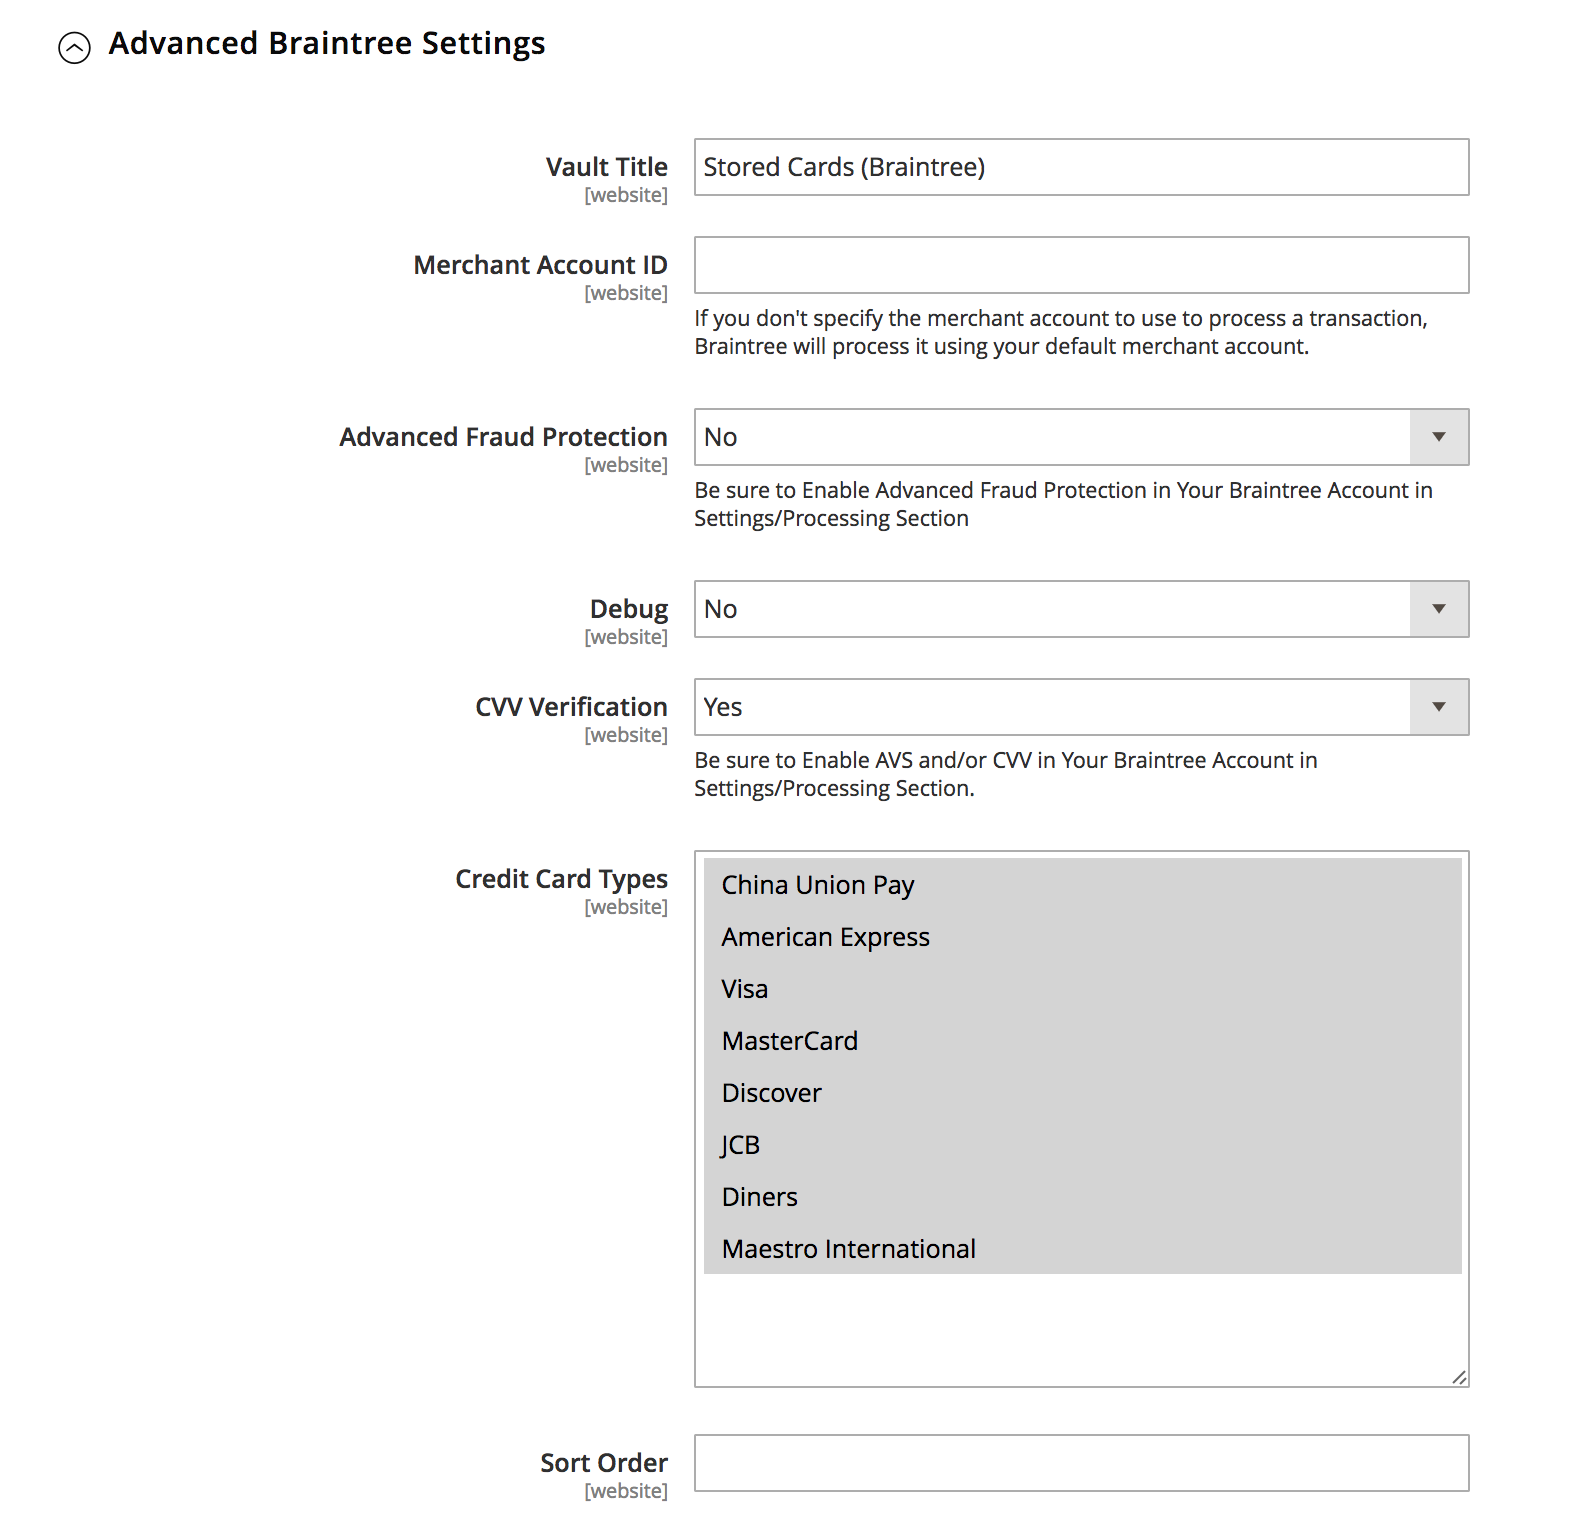
Magento 2.0
Magento 2.1
This Magento version updates 2 more configs.
- Fill in the
Vault title. - Enter the credentials from your Braintree account into the
Merchant Account IDfield.
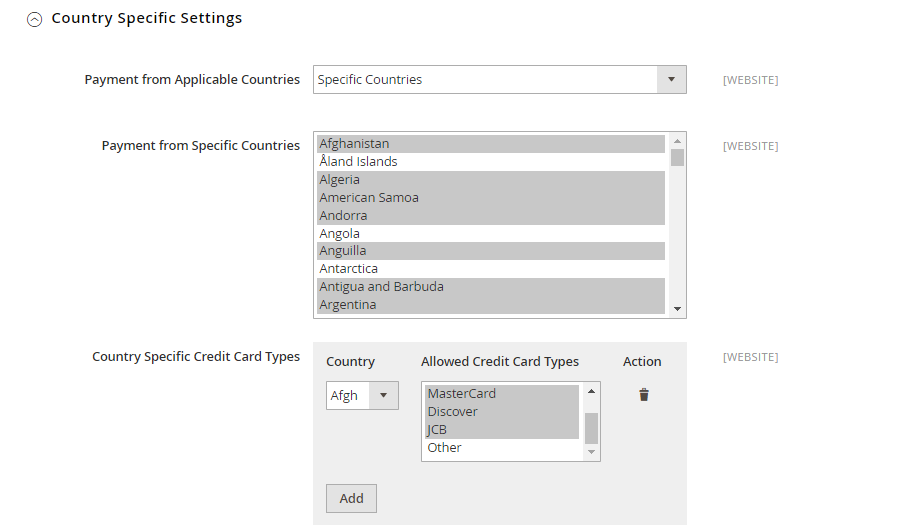
Step 4: Set options for Country Specific Settings
- In the
Payment from Applicable Countriesfield, chooseAll Allowed Countriesto accept Braintree Payment Method for customers from all countries specified in your store configuration orSpecific Countriesto approve this payment method for some definite countries which you select from thePayment from Specific Countrieslist. - In the
Country Specific Credit Card Typessection:- Click on the
Addbutton. - Select the
Countryand choose theAllowed Credit Card Typefrom the list. - Repeat to identify the credit cards that are accepted from each country.
- Click on the
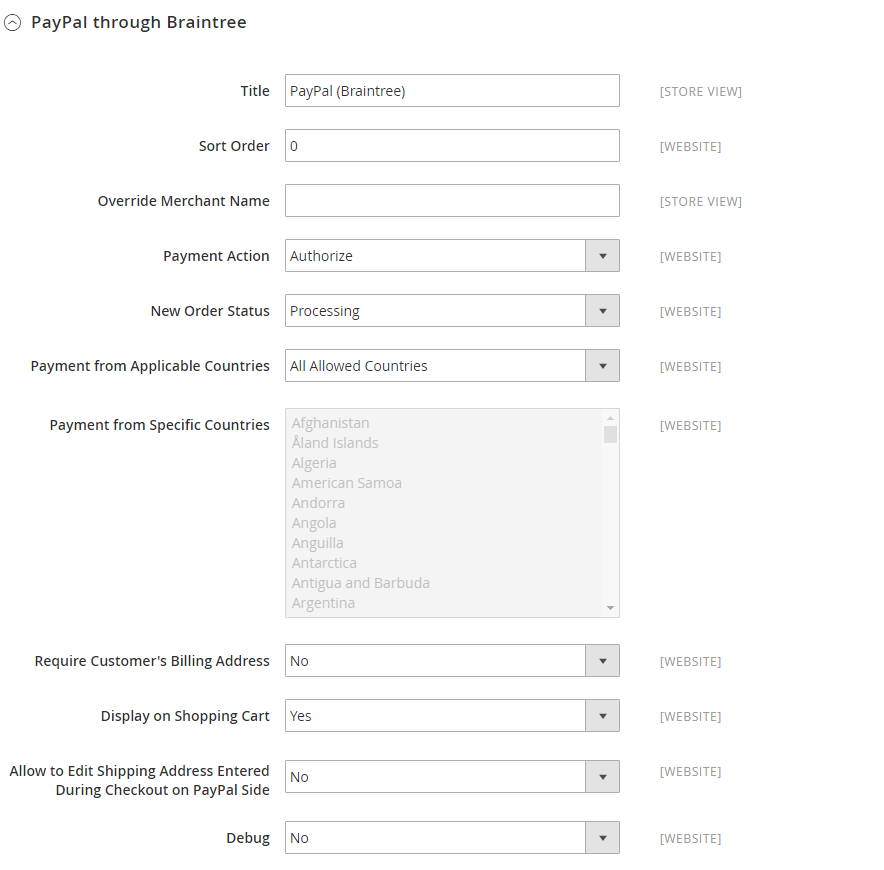
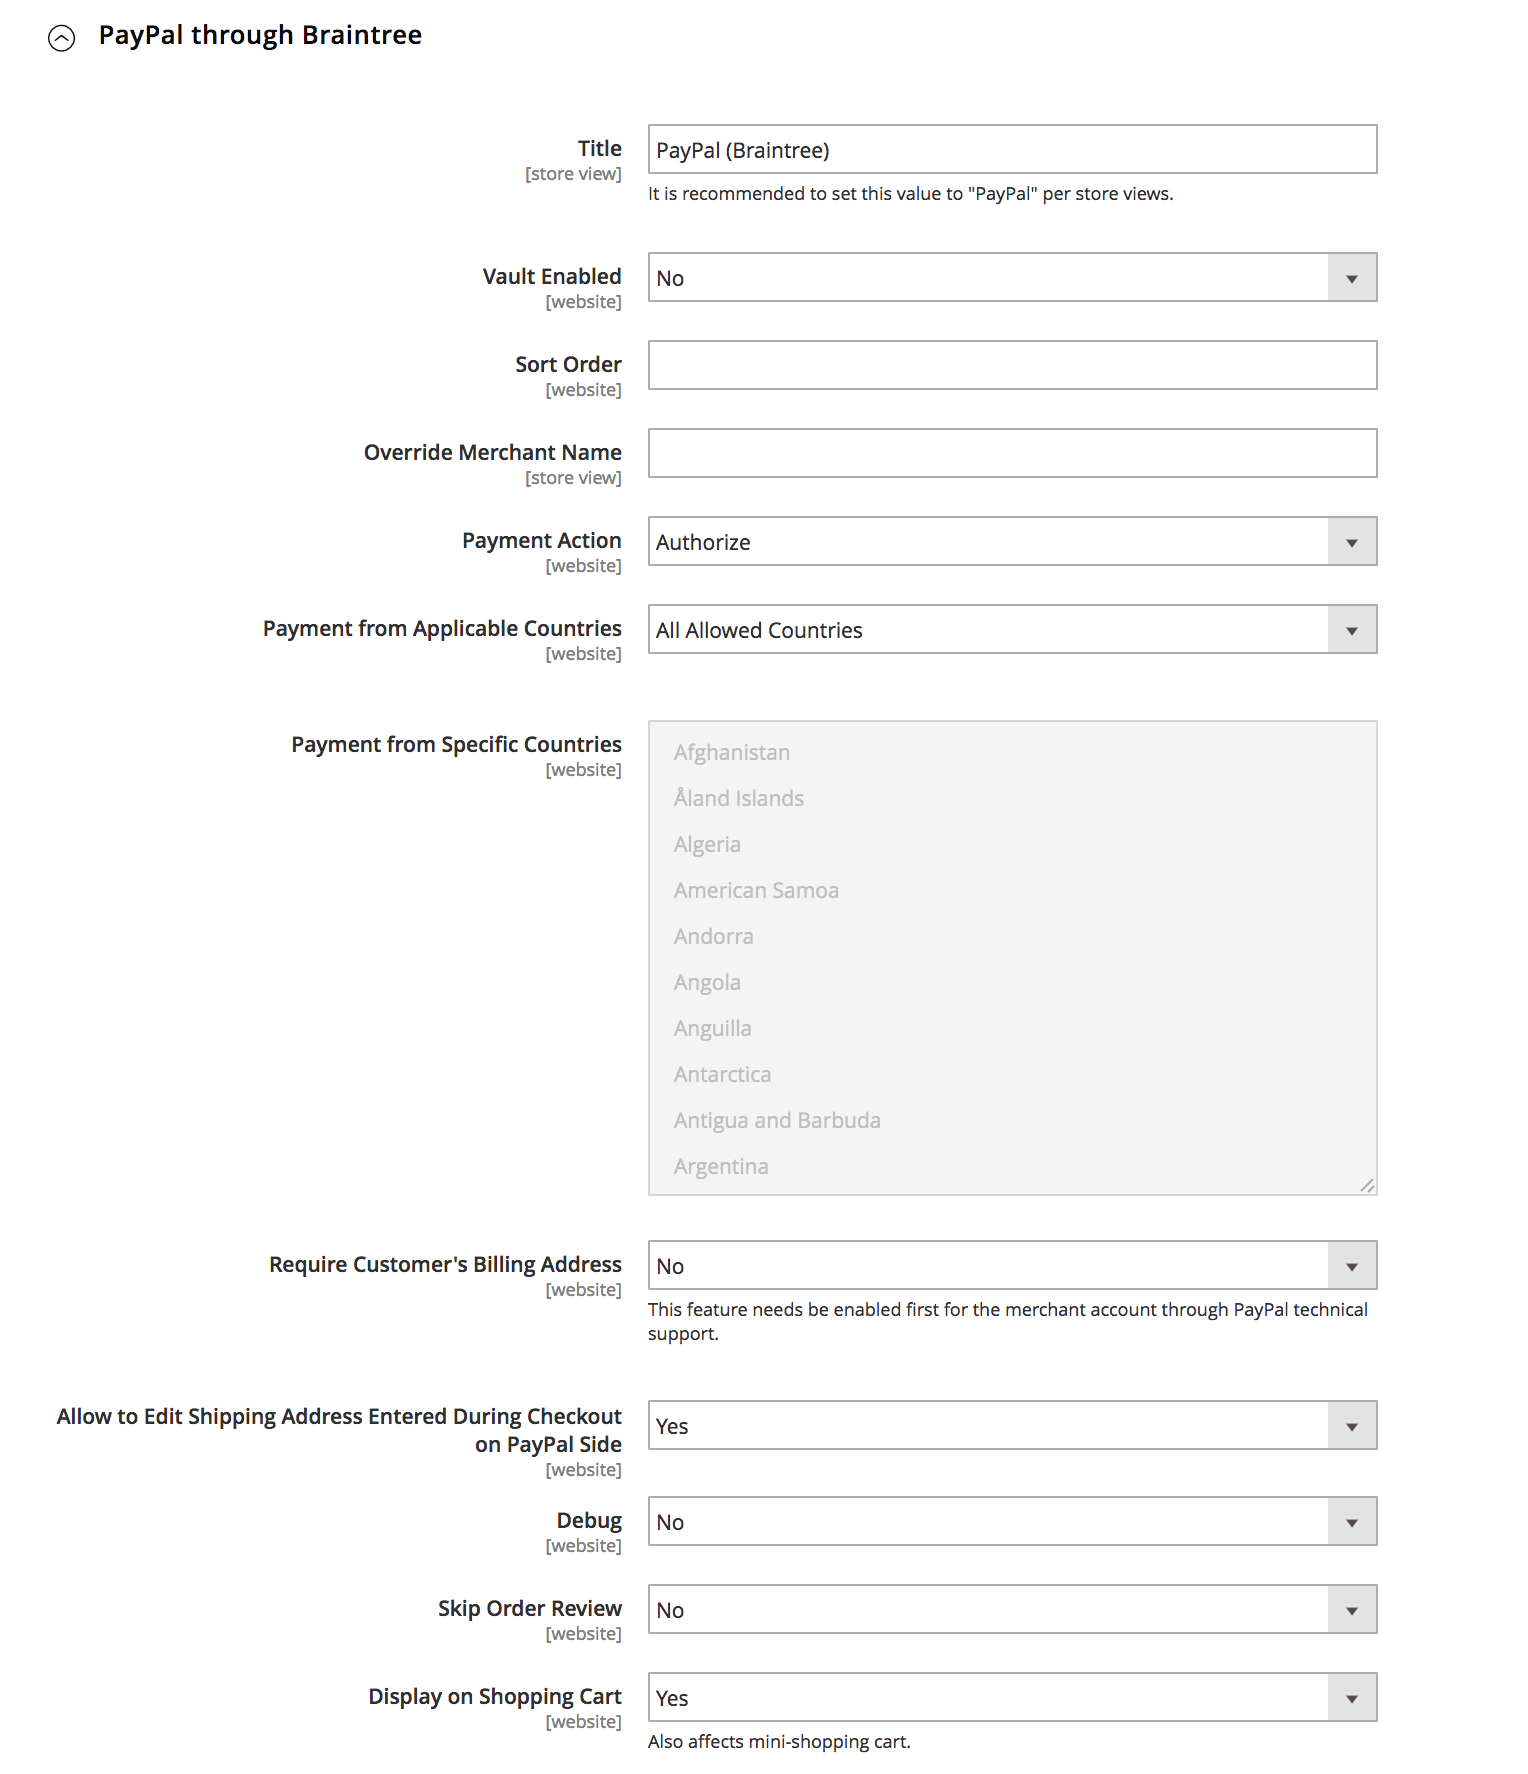
Step 5: Set options for PayPal through Braintree Settings
- In the
Titlefield, enter a new title or leave the default ofPayPal (Braintree)to display Braintree’s payment by PayPal on the checkout page. - In the
Sort Orderfield, enter a number to determine the position of Braintree’s payment by PayPal in the list of payment methods that is shown during checkout (start from 0). - In the
Override Merchant Namefield, enter the name as you want it to appear to display your merchant name differently than what is specified in your store configuration. - In the
Payment Actionfield, setAuthorizeto approve the purchase, but puts a hold on the funds to wait for being captured by the merchant orAuthorize and Captureto imply that the purchase is already authorized and can be withdrawn from the customer’s account at once. - In the
New Order Statusfield, setProcessingorSuspected Fraud. - In the
Payment from Applicable Countriesfield, chooseAll Allowed Countriesto accept Braintree’s payment by PayPal for customers from all countries specified in your store configuration orSpecific Countriesto approved this payment method for some definite countries which you select from thePayment from Specific Countrieslist. - Set
Require Customer’s Billing AddresstoYesto require that customers provide a billing address. - Set
Display on Shopping CarttoYesto display thePayPalbutton in the mini shopping cart and on the shopping cart page. - Set
Allow to Edit Shipping Address Entered During [Checkout](https://www.mageplaza.com/magento-2-one-step-checkout-extension/) on PayPal SidetoYesto enable customers to edit the shipping address while completing a PayPal transaction. - Set
DebugtoYesto save a log file of interactions between your store and PayPal through Braintree.
Magento 2.0
Magento 2.1
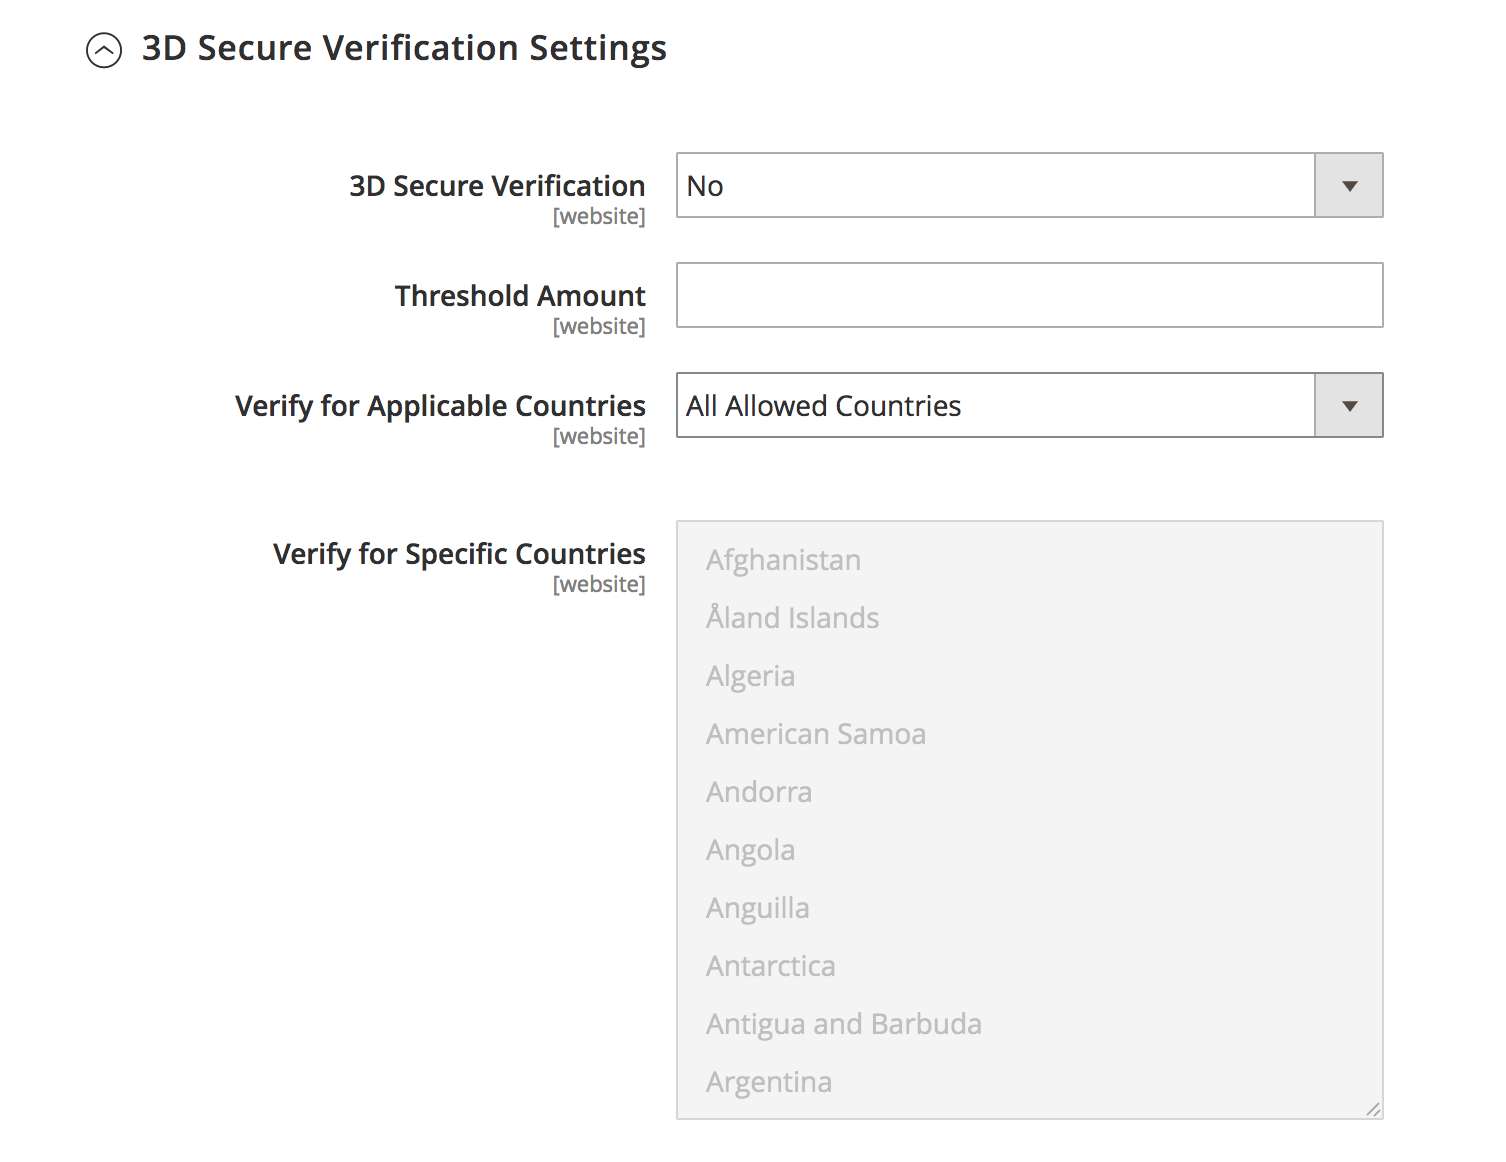
Step 6: Set options for 3D Verification Settings
- Set
3d Secure VerificationtoYesto add a verification step for customers using credit cards that are enrolled in a verification program such as Verified by VISA. - Click
Save Configbutton in the upper-right corner when you are done.
Magento 2.0

Magento 2.1
There are 3 more options:
- Set the
Threshold amount. - Choose to verify for
Applicable Countriesor forSpecific Countries.
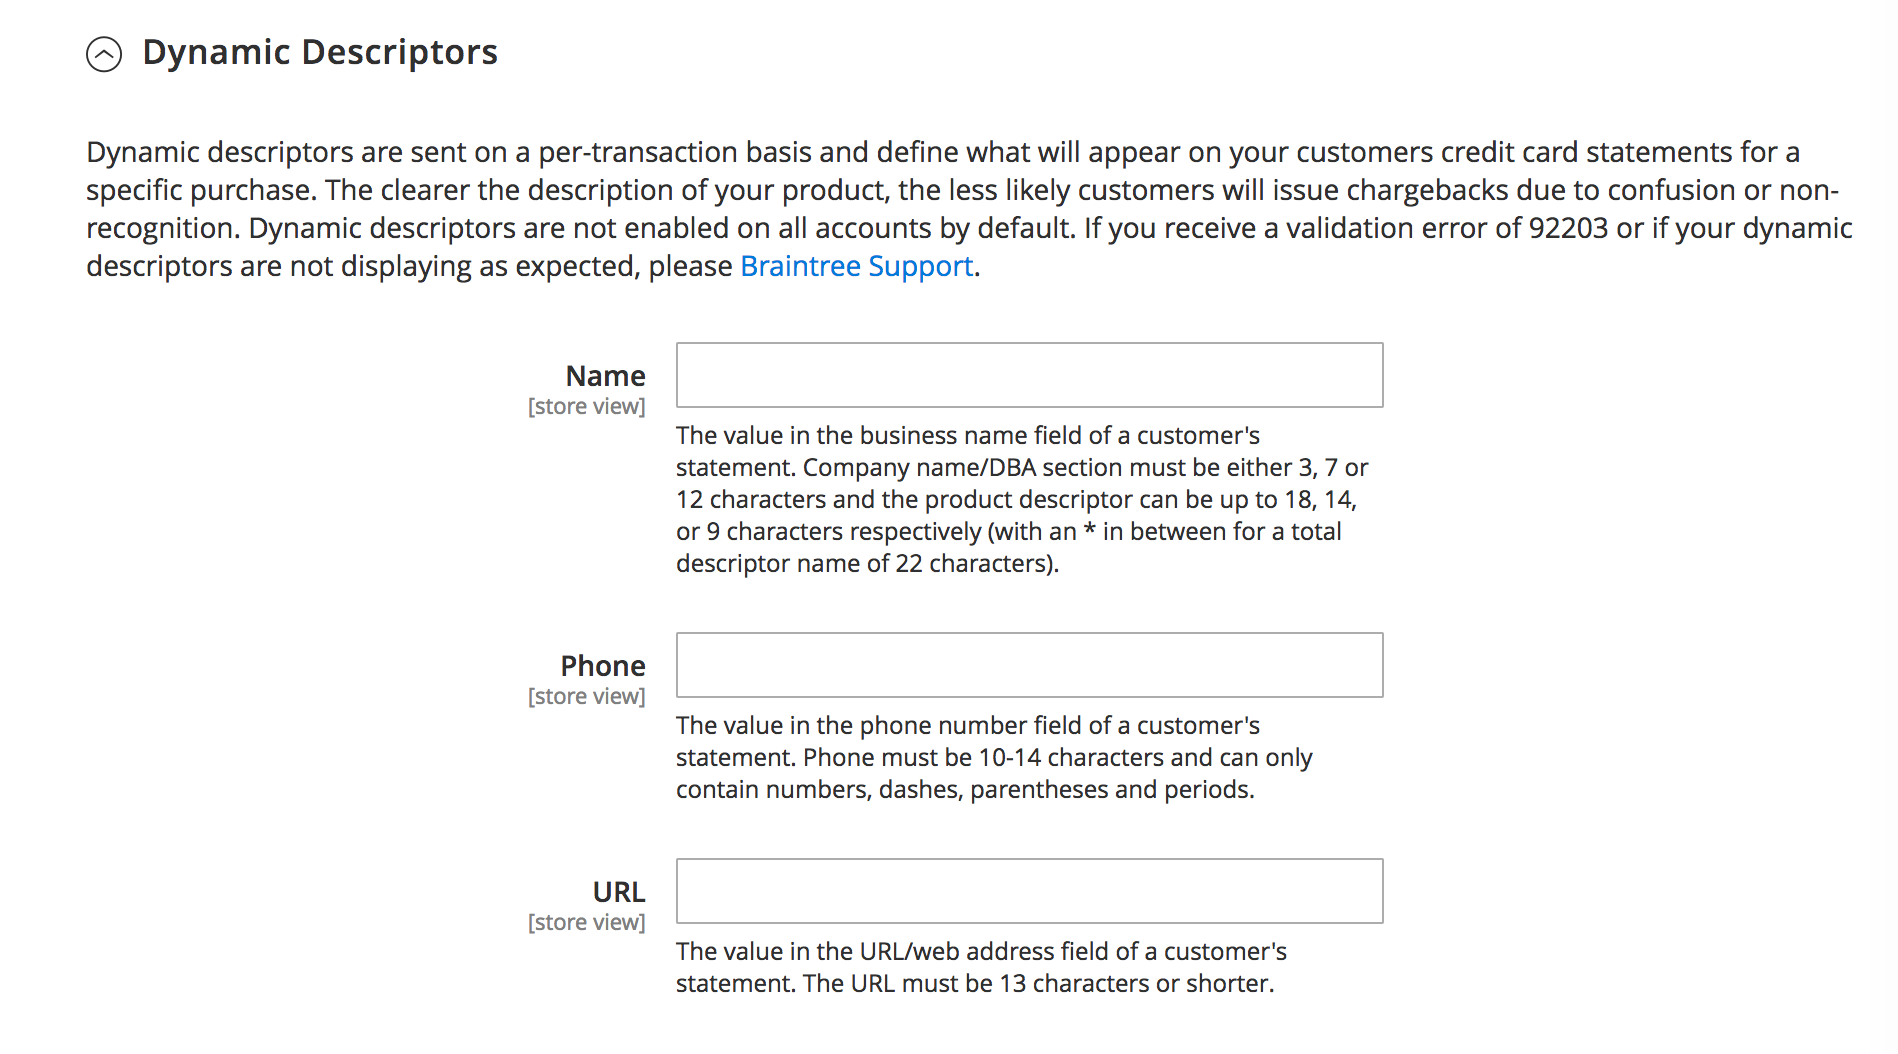
Step 7
This section is ONLY available in Magento 2.1.
Basically, Dynamic Descriptors is the custom descriptor configured and passed with each transaction via the API. In this section, there are 3 options to fill the Name, Phone and URL of the description.
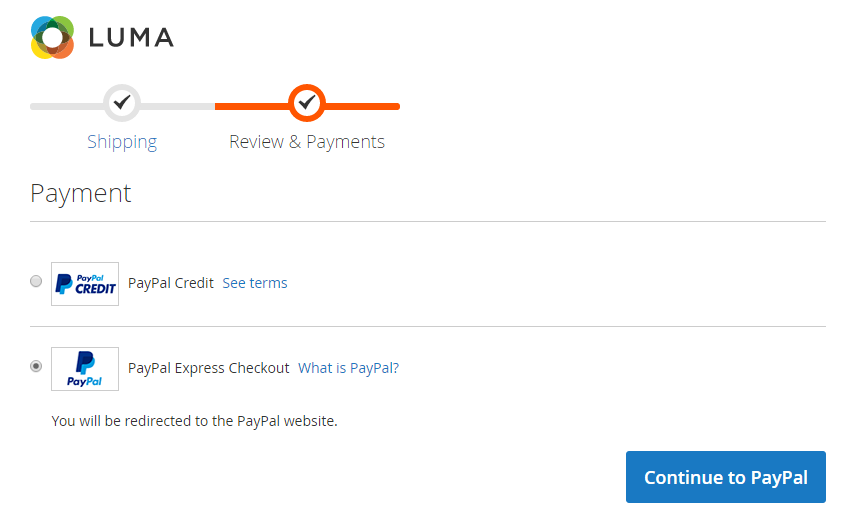
2. Configure PayPal Express Checkout Payment Method
PayPal Express Checkout Payment Method is the most convenient payment method on the internet nowadays. It is confirmed that integrating PayPal on your store can increase conversion rate twice and raise the overall customers up to 29%. PayPal is trusted and used widely for its fast checkout; utility when accepting debit card, credit card and almost all currencies in the world; as well as absolute security. For all the reasons above, PayPal Express Checkout appear on every online store. To manage PayPal Express Checkout Payment Method on your Magento website, let’s follow the steps below.
5 Steps to Configure PayPal Express Checkout Payment Method in Magento 2
- Step 1: Prepare PayPal Account
- Step 2: Prepare for PayPal Express Checkout Configuration
- Step 3: Set options for Required Settings
- Step 4: Set options for Basic Settings
- Step 5: Set options for Advanced Setting
Step 1: Prepare PayPal Account
Before integrating PayPal to your store, you should configure your PayPal account to take the information of your PayPal account ID, your email address, your API username, your API password, and your API signature.
- First thing overall is working with merchant account:
- Go to manager.paypal.com and log in to your account or sign up for a new merchant account.
- Click
Service Settings > Hosted Checkout Pages > Set Up, then setAVSfield toNo,CSCfield toNoandEnable Secure TokentoYes. - Click
Save. - Next, you will be recommended to add another user to your account. Then,
- Log into your account again in man ager.paypal.com.
- Follow PayPal guidance to get an additional user.
- Click
Save. - Click on
Required PayPal Settingsand set the options for the section. - In the
Email Addressfield, type the exact email which is used to sign up your PayPal merchant account. - In the
API Authentication Methodsfield, selectAPI SignatureorAPI Certificate. Credentials from PayPalis an optional section, complete it if needed.- Set Sandbox Mode to
Yesin case you are using credentials from your sandbox account. Then, clickSandbox Credentialsand follow the instructions to set up your testing environment if needed. - If your system uses a proxy server to establish the connection between Magento and the PayPal payment system, set
API Uses ProxytoYesand complete theProxy HostandProxy Portfields. - After finishing all sections above, set
Enable this SolutiontoYes. - If you want to offer financing through PayPal to your customers, go to PayPal Credit to learn more. As the Basic and Advanced Settings can be configured later, click
Save configand start to work with Magento site.
Step 2: Prepare for PayPal Express Checkout Configuration
This step is used to build basement for configuring PayPal Express Checkout.
- On the Admin sidebar, choose
Stores > Settings > Configuration. - In the panel on the left, click
Sales > Payment Methods. - If you install multiple websites, stores or views, choose
Store Viewin the upper-left corner where the configuration applies. - Click
Merchant Locationand set your country toMerchant Countryfield. If this field is left blank, Default Country from General Config will be used. - Choose
PayPal All-In-One Payment SolutionsorPayPal Express Checkoutto clickConfigure.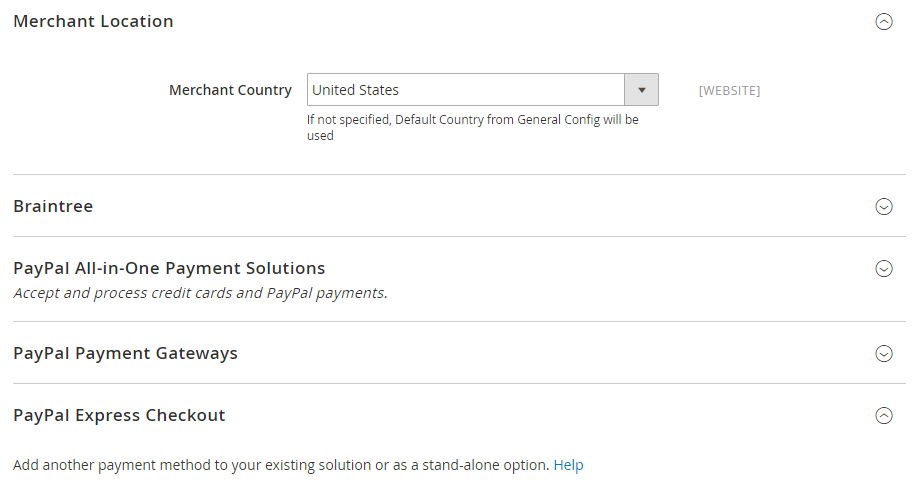
Step 3: Set options for Required Settings
In Magento 2, you can choose to use PayPal Express Checkout or PayPal All-In-One solution. Once you configure a solution, the other is automatically deactivated. Both PayPal Express Checkout and PayPal All-In-One solution have three part of setting: Required settings, Basic settings and Advanced settings, therefore the guidance below only consists of the PayPal Express Checkout.
-
Expand the
Required PayPal SettingsthenExpress Checkoutsection.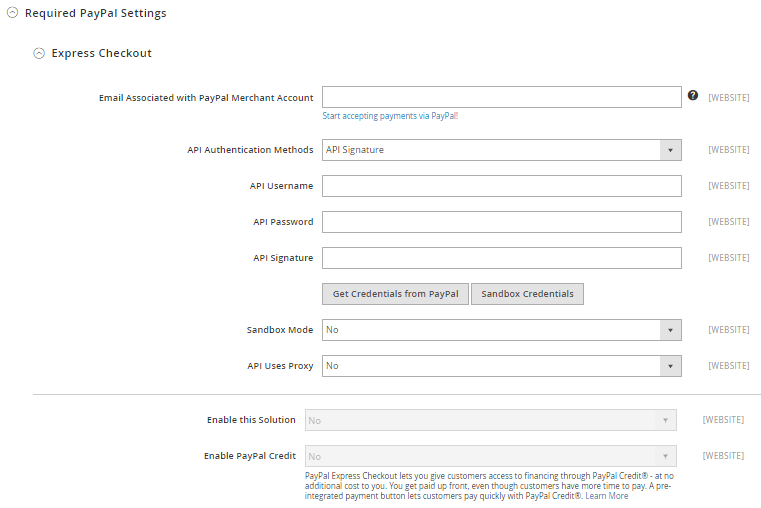
- In the
Email Associated with PayPal Merchant Accountfield, enter the exact mail that is specified in your merchant PayPal account. - In the
API Authentication Methodsfield, select one of the following: API Signatureand fill theAPI Username,API PasswordandAPI Signaturefields.API Certificateand fill theAPI UsernameandAPI Passwordfields. In theAPI Certificatefield, upload a file of API Certificate to complete.- Click
Get Credentials from PayPalorSandbox Credentialsif needed, a link to PayPal will be opened in a new window. You should log in and follow the instructions. - If your system uses a proxy server to connect Magento with the PayPal payment system, set
API Uses ProxytoYesthen complete theProxy HostandProxy Portfields. - In the
Enable This Solutionfield, chooseYesto activate PayPal Express Checkout. - In the
Enable PayPal Creditfield, selectYesto accept PayPal Credit on your store. - Expand the
Advertise PayPal Creditsection. - Click
Get Publisher ID from PayPaland take your account ID information then fill in the Publisher ID field. - Expand the
Home Pagesection and set the options. - In the
Displayfield, chooseYesto enable the banner appear on Home Page or “No” to disable it. - In the
Positionfield, select the location of the banner on Home Page. - In the
Sizefield, set the size of the banner to suitable with your store. - Do the same for the
Catalog Category Page,Catalog Product Page, andCheckout Cart Pagesections.
Step 4: Set options for Basic Settings
You will start to configure how PayPal Express Checkout displays in this step.
- Click to expand the
Basic Settingssection. - In the
Titlefield, enter a new title or leave it in default ofPayPal Express Checkout. - In the
Sort Orderfield, enter a number to determine the position of PayPal Express Checkout Payment in the list of payment methods that is shown in the checkout page (start from 0). - In the
Payment Actionfield, set to one of the following: Authorizationto approve the purchase, but puts a hold on the funds to wait for being “captured” by the merchant.Saleto imply that the purchase is already authorized and can be withdrawn from the customer’s account at once.Orderto show that the order is neither authorized nor captured. WhenOrderis chosen, there are three more fields to complete. Note that, to change any default data in these fields, you need to contact to PayPal.- In the
Display on Product Details Pagefield, selectYesto To display theCheckout with PayPalbutton on the product page.
Step 5: Set options for Advanced Settings.
The advanced settings section includes of advanced configuration when integrating PayPal.
- Click to expand the
Advanced Settingssection. - In the
Display on Shopping Cartfield, chooseYesto display theCheckout with PayPalbutton in the shopping cart. - In the
Payment Applicable Fromfield, chooseAll Allowed Countriesto accept PayPal Express Checkout for customers from all countries specified in your store configuration orSpecific Countriesto approve this payment method for some definite countries which you select from thePayment from Countries Payment Applicable Fromlist. - In the
Debug Modefield, setYesto write communications with the payment system into the log file. The log file for PayPal Payments Advanced ispayments_payflow_advanced.log. - Set
Enable SSL Verificationfield toYesto enable host authenticity verification. - Set
Enable SSL VerificationtoYesto enable host authenticity verification. - Set
Transfer Cart Line ItemstoYesto display a full summary of the customer’s order by line item from the PayPal site then setTransfer Shipping OptionstoYesto include up to ten shipping options in the summary. - In the
Shortcut Buttons Flavorfield, to determine the type of image used for the PayPal acceptance button, chooseDynamicto display an image that can be dynamically changed from the PayPal server or chooseStaticto display a specific image that cannot be dynamically changed. - Set
Enable PayPal Guest CheckouttoYesto allow customers without PayPal accounts to make purchases with this method. - In the
Require Customer’s Billing Addressfield, chooseYesto require the customer’s billing address for all purchases; chooseNoto exclude the requirement or chooseFor Virtual Quotes Onlyto require the customer’s billing address for virtual quotes only. - In the
Billing Agreement Signupfield, setAutoto allow your customers to sign a billing agreement during the Express Checkout flow or use another method of payment; setAsk Customerto allow your customers to decide whether to sign a billing agreement during the Express Checkout flow or setNeverto disable signing a billing agreement during the Express Checkout flow. -
Set
Skip Order Review SteptoYesto let the customer complete the transaction from the PayPal site without returning to your Magento store for Order Review.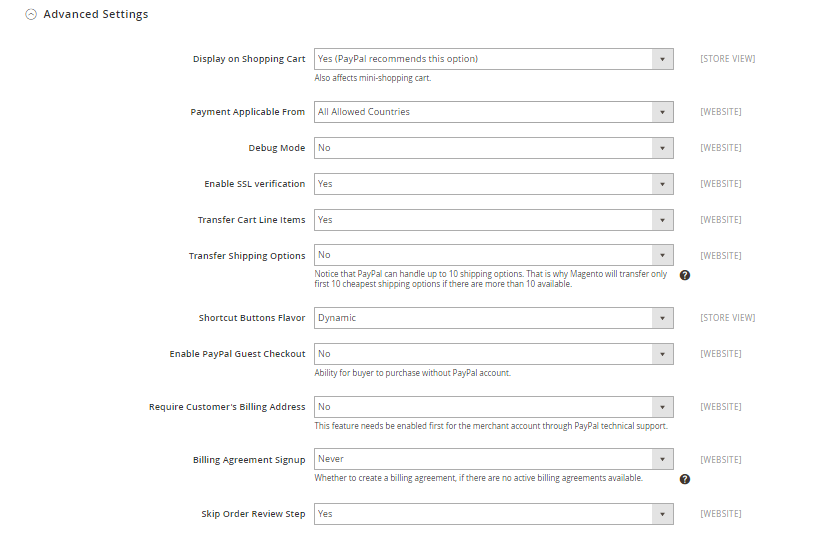
- Now you generally complete the Advanced Settings. Click
Save Configto save the process or continue with three more sections below if necessary for your store. - Expand
PayPal Billing Agreement Settingsto configure Billing Agreement for customers who have already entered into a billing agreement with your company. -
Set
EnabledtoYesto activate PayPal Billing Agreement then complete the settings as same as the instruction for PayPal Express Checkout.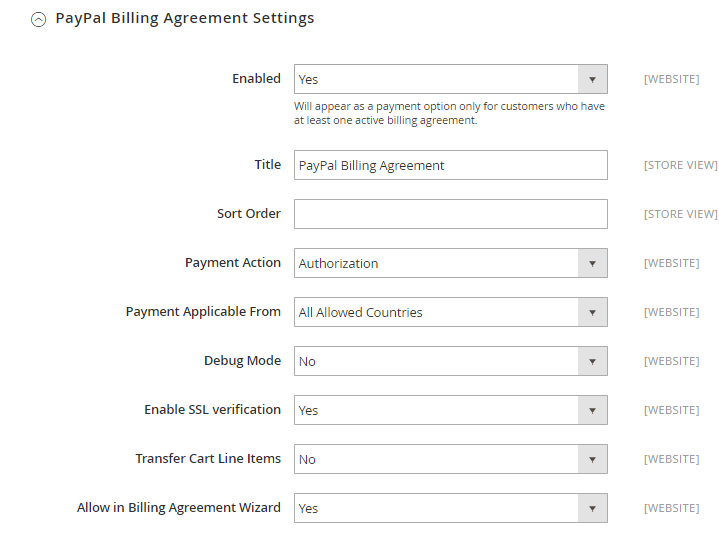
- In the
Settlement Report Settingssection, If you have signed up for PayPal’s Secure FTP Server, enter the SFTP login credentials inLoginandPasswordfields. - Set
Sandbox ModetoYesto run test reports before “going live” with Express Checkout on your site. - Complete the
Custom Endpoint Hostname or IP Addressfield. By default, the value is:reports.paypal.com. - Complete the
Custom Pathfield to show where reports are saved. By default, the value is:/ppreports/outgoing. -
Under
Scheduled Fetching, setEnable Automatic FetchingtoYesto generate reports according to a schedule and choose the frequency to generate the report in theSchedulefield. Then in theTime of Dayfield, set the hour, minute, and second when you want the reports to be generated.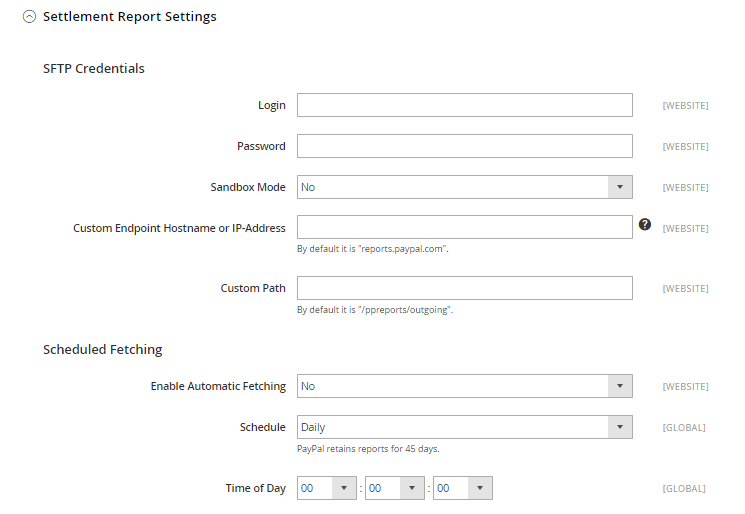
- The last section -
Frontend Experience Settings, allows you to customize the appearance of your PayPal merchant pages and PayPal logos on your site. - In the
PayPal Product Logofield, choose the size of PayPal Logo to display on your catalog pages and homepage. - In the
Page Stylefield, enter the name of the page style that you want to apply to your PayPal merchant pages. - In the
Header Image URLfield, enter the URL of the image you want to appear in the upper-left corner of the payment page. The maximum file size is 750 pixels wide by 90 pixels high. -
In the
Header Background Color,Header Border ColorandPage Background Colorfields, enter the six-character hexadecimal code, without the “#” symbol to complete.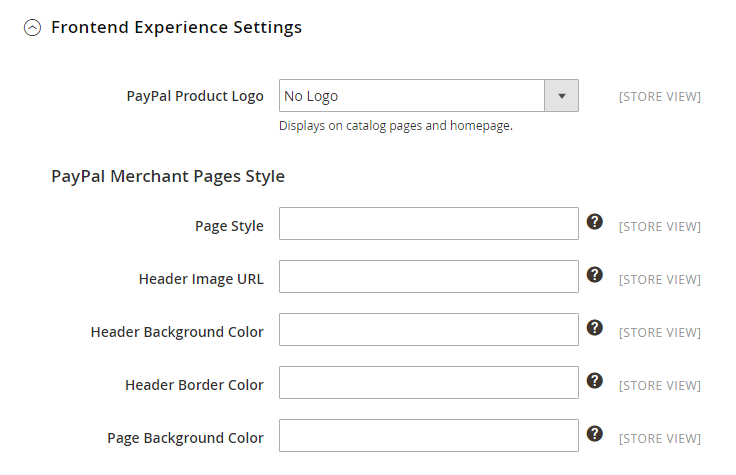
- Click the
Save Configbutton in the upper-right corner when you are done.
3. Configure Bank Transfer Payment Method

Because of the flourishing of the Banking Industry, the Bank Transfer Payment Method becomes a required payment method for every purchase in the world. Therefore, it is clear that Magento 2 allows you to configure the Bank Transfer Payment Method in the admin interface. This payment method also has the feature to only permit customers from specific countries to use depending on the merchant’s bank location and requirement.
3 Steps to Configure Bank Transfer Payment Method in Magento 2
- Step 1: Open the Bank Transfer Payment Section
- Step 2: Set options for Bank Transfer Payment Section
- Step 3: Save the configuration
Step 1: Open the Bank Transfer Payment Section
- On the Admin sidebar, click
Stores > Settings > Configuration. - In the panel on the left, choose
Sales > Payment Methods > Bank Transfer Payment.
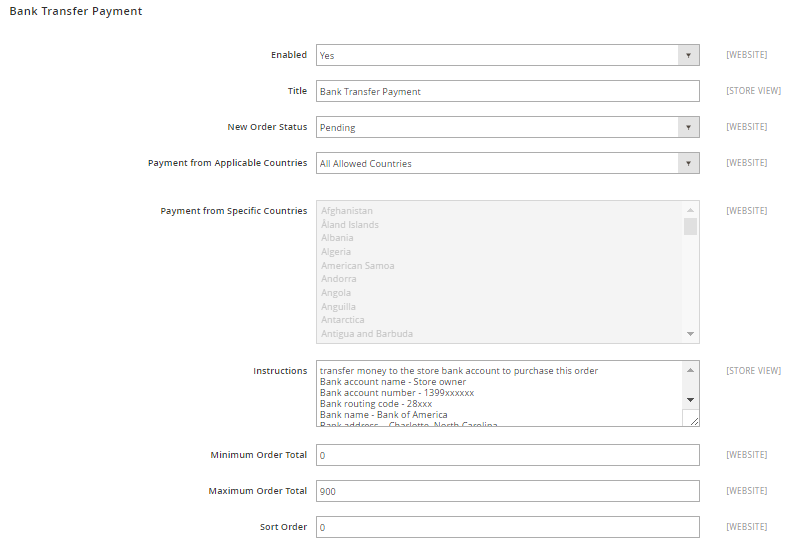
Step 2: Set options for Bank Transfer Payment Section
- In the
Enabledfield, pickYesto activate Bank Transfer Payment Method. - In the
Titlefield, enter a new title to change or leave the default ofBank Transfer Paymentto recognize the Bank Transfer Payment Method during checkout. - In the
New Order Statusfield, setPendingfor new orders to wait until receipt of payment is authorized by admin. - In the
Payment from Applicable Countriesfield, chooseAll Allowed Countriesto accept Bank Transfer Payment Method for customers from all countries specified in your store configuration orSpecific Countriesto approved this payment method for some definite countries which you select from thePayment from Specific Countrieslist. - In the
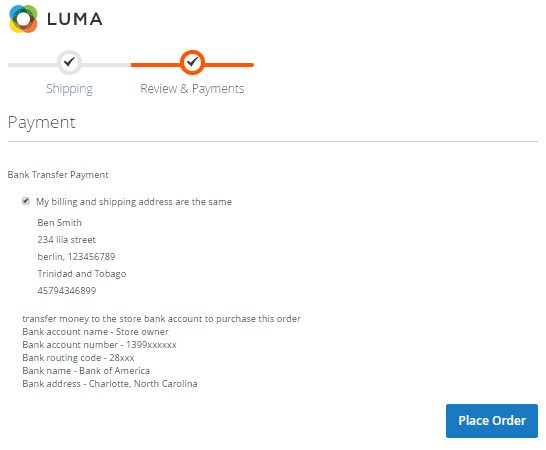
Instructionsfield, enter guidance for the customer to make a Bank Transfer payment. You had better supply customers with the following information:- Bank account name
- Bank account number
- Bank routing code
- Bank name
- Bank address
- In the
Minimum Order TotalandMaximum Order Totalfields, set the order amounts required to qualify for this payment method. - In the
Sort Orderfield, enter a number to determine the position of Bank Transfer Payment in the list of payment methods that is shown during checkout (start from 0).
Step 3: Save the configuration
- Click the
Save Configbutton in the upper-right corner when you are done. - If you are notified to refresh the page cache, click the links in the notification, and follow the instructions.
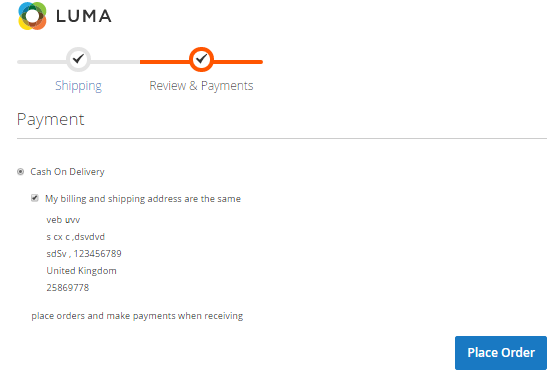
4. Configure Cash On Delivery Payment Method
Cash On Delivery is a type of transaction in which the customer makes payment to the shipping carrier when receiving the good. This payment method is popular and convenient for buyers who do not prefer online payment methods but still want to send items to a certain address. With Magento Community Edition 2.0, you can accept and adjust Cash On Delivery payments for your store. Cash On Delivery payment method is approved by admins for only customers from specific countries and recipients can make payment by cash, check or money order.
3 Steps to Configure Cash On Delivery Payment Method
- Step 1: Go to the Cash On Delivery Payment Section
- Step 2: Complete the fields in Cash On Delivery Payment Section
- Step 3: Save the configuration
Step 1: Go to the Cash On Delivery Payment Section
- On the Admin sidebar, click Stores > Settings > Configuration.
- In the panel on the left, choose
Sales > Payment Methods > Cash On Delivery Payment.
Step 2: Complete the fields in Cash On Delivery Payment Section
- In the
Enabledfield, pickYesto activate Cash On Delivery Payment Method. - In the
Titlefield, enter a new title to change or leave the default ofCash On Deliveryto recognize the Cash On Delivery payment method during checkout. - In the
New Order Statusfield, setPendingfor new orders to wait until receipt of payment is confirmed by admin. - In the
Payment from Applicable Countriesfield, chooseAll Allowed Countriesto accept Cash On Delivery Payment Method for customers from all countries specified in your store configuration or Specific Countries to approve this payment method for some definite countries which you select from the Payment from Specific Countries list. - In the
Instructionsfield, enter guidance for the customer to make a Cash On Delivery payment. - In the
Minimum Order TotalandMaximum Order Totalfields, set the order amounts required to qualify for this payment method. - In the
Sort Orderfield, enter a number to determine the position of Cash On Delivery in the list of payment methods that is shown during checkout (start from 0).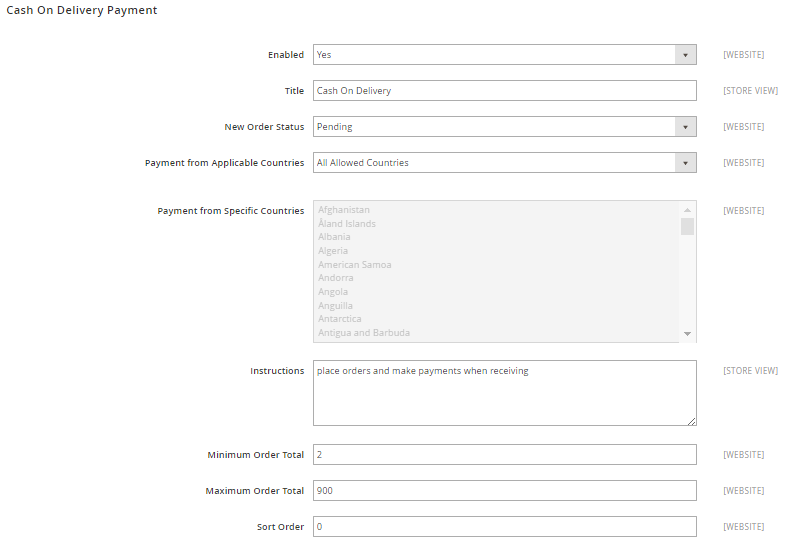
Step 3: Save the configuration
- Click the
Save Configbutton in the upper-right corner when you are done. - If you are notified to refresh the page cache, click the links in the notification, and follow the instructions.
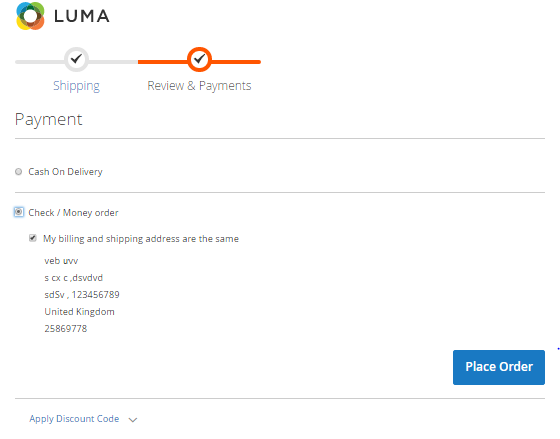
5. Configure Check Money Order Payment Method
The Check Money Order Payment Method is the replacement of credit cards for online stores that customers can pay by check or money order. This payment method is normally set as default in Magento Community Edition 2.0 and you can now accept payments by check or money order. Actually, the check money order can be determined to be only approved for some specific countries. To manage the Check Money Payment Method, you can follow the steps in the guidance below.
3 Steps to Configure Check Money Order Payment Method
- Step 1: Launch the Check Money Payment Method
- Step 2: Complete the fields in Check/Money Order Section
- Step 3: Save the configuration
Step 1: Launch the Check Money Payment Method
- On the Admin sidebar, click
Stores > Settings > Configuration. - In the panel on the left, choose
Sales > Payment Methods > Check / Money Order.
Step 2: Complete the fields in Check/Money Order Section
- In the
Enabledfield, pickYesto activate Check Money Order Payment Method. - In the
Titlefield, enter a new title to change or leave the default ofCheck / Money orderto recognize the Check Money Order payment method during checkout. - In the
New Order Statusfield, setPendingfor new orders to wait until receipt of payment is confirmed by admin. - In the
Payment from Applicable Countriesfield, chooseAll Allowed Countriesto accept the Check Money Order Payment Method for customers from all countries specified in your store configuration orSpecific Countriesto approve this payment method for some definite countries which you select from thePayment from Specific Countrieslist. - In the
Make Check Payable Tofield, enter the name of the party to whom the check must be payable. - In the
Send Check Tofield, type the address or PO Box where the checks are mailed. - In the
Minimum Order TotalandMaximum Order Totalfields, set the order amounts required to qualify for this payment method. - In the
Sort Orderfield, enter a number to determine the position of Check / Money Order in the list of payment methods that is shown during checkout (start from 0).

Step 3: Save the configuration
- Click the
Save Configbutton in the upper-right corner when you are done. - If you are notified to refresh the page cache, click the links in the notification, and follow the instructions.
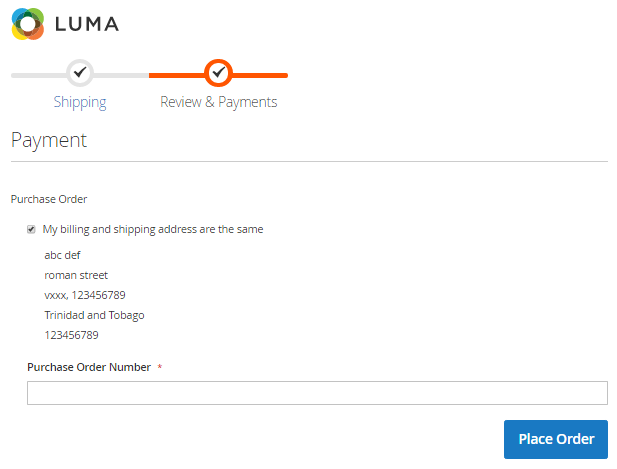
6. Configure Purchase Order Payment Method
Commercial customers can be allowed to use Purchase Order to afford for purchases with anterior authorization by referencing the PO number. This payment method is usually applied for wholesale orders. This time, we would like to guide you to set the configuration for the Purchase Order payment method. Noting that before accepting payment by purchase order, you should set the credit worthiness of the commercial customer.
3 Steps to Configure Purchase Order Payment in Magento 2
- Step 1: Go to Purchase Order tab
- Step 2: Complete the fields in Purchase Order Section
- Step 3: Save the configuration
Step 1: Go to Purchase Order tab
- On the Admin sidebar, click
Stores > Settings > Configuration. - In the panel on the left, choose
Sales > Payment Methods > Purchase Order.
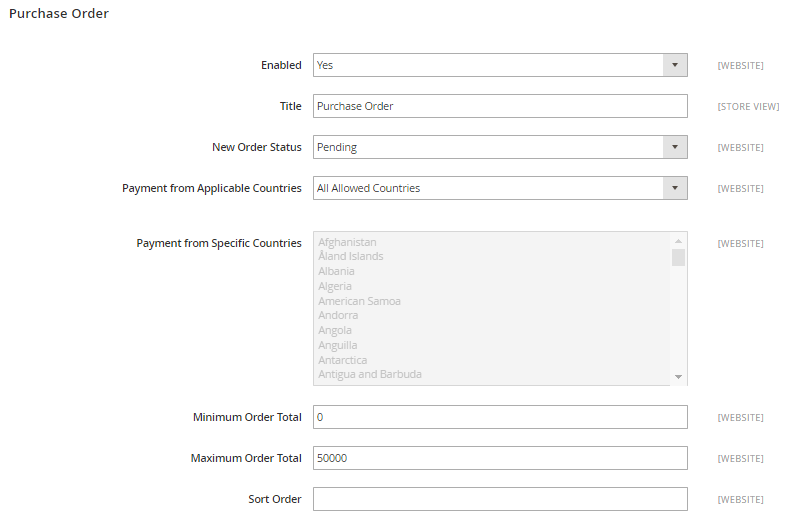
Step 2: Complete the fields in Purchase Order Section
- In the
Enabledfield, pickYesto activate the Purchase Order Payment Method. - In the
Titlefield, enter a new title to change or leave the default ofPurchase Orderto recognize the Purchase Order Payment Method during checkout. - In the
New Order Statusfield, setPendingfor new orders to wait until receipt of payment is authorized by admins. - In the
Payment from Applicable Countriesfield, chooseAll Allowed Countriesto accept Purchase Order Payment Method for customers from all countries specified in your store configuration orSpecific Countriesto approve this payment method for some definite countries which you select from thePayment from Specific Countrieslist. - In the
Minimum Order TotalandMaximum Order Totalfields, set the order amounts required to qualify for this payment method. - In the
Sort Orderfield, enter a number to determine the position of Purchase Order Payment in the list of payment methods that is shown during checkout (start from 0).
Step 3: Save the configuration
- Click on the
Save Configbutton in the upper-right corner when you are done. - If you are notified to refresh the page cache, click the links in the notification, and follow the instructions.
7. Configure Zero Subtotal Checkout Payment Method
People will never say no to free products; therefore Zero Subtotal Checkout is the payment method needed for the order that its grand total equals zero. Zero-grand total order may be the result of a discount or applied coupon with free shipping or created manually by admins due to any problem happening with the products in the last orders. This payment method is enabled by default in Magento 2.0 and you can customize some advanced configuration in the backend as the instruction below.
3 Steps to Configure Zero Subtotal Checkout Payment Method in Magento 2
- Step 1: Open the Zero Subtotal Checkout Tab
- Step 2: Set options for Zero Subtotal Checkout Section
- Step 3: Save the configuration
Step 1: Open the Zero Subtotal Checkout Tab
- On the Admin sidebar, click
Stores > Settings > Configuration. - In the panel on the left, choose
Sales > Payment Methods > Zero Subtotal Checkout.
Step 2: Set options for Zero Subtotal Checkout Section
- In the
Titlefield, enter a new title to change or leave the default of “No Payment Information Required” to recognize the Zero Subtotal Checkout Payment Method during checkout. - In the
Enabledfield, pickYesto activate Zero Subtotal Checkout Payment Method. - In the
New Order Statusfield:- set
Pendingfor new orders to wait for the authorization; - set
Processingif the payment is already authorized and processing; - set
Suspected Fraudif a fraud is detected.
- set
- In the
Payment from Applicable Countriesfield, chooseAll Allowed Countriesto accept Zero Subtotal Checkout Payment Method for customers from all countries specified in your store configuration orSpecific Countriesto approved this payment method for some definite countries which you select from thePayment from Specific Countrieslist. - In the
Sort Orderfield, enter a number to determine the position of Zero Subtotal Checkout Payment in the list of payment methods that is shown during checkout (start from 0).
Step 3: Save the configuration
- Click the
Save Configbutton in the upper-right corner when you are done. - If you are notified to refresh the page cache, click the links in the notification, and follow the instructions.
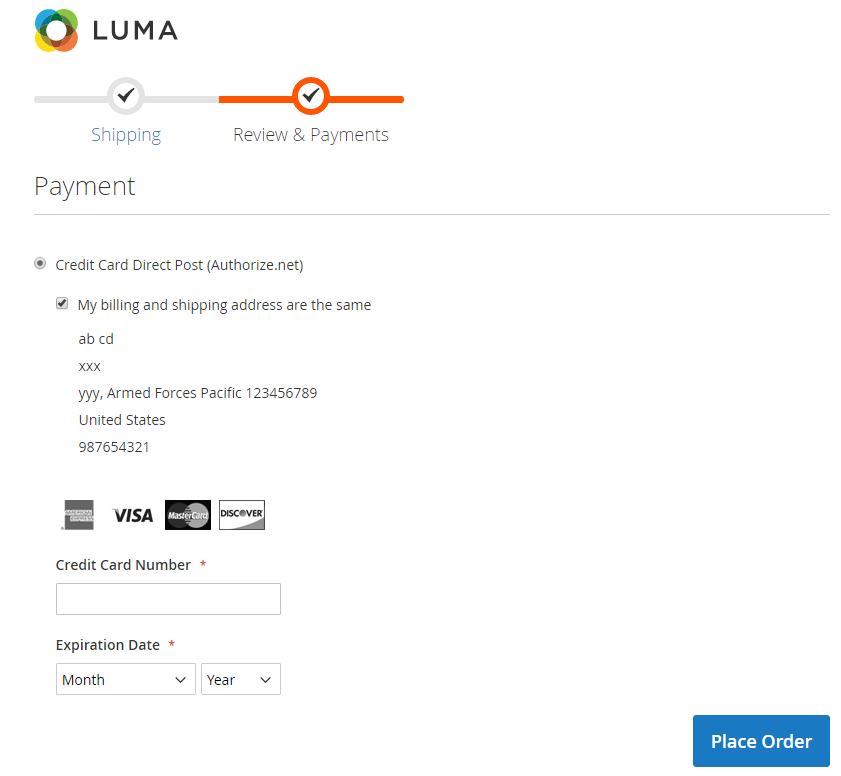
8. Configure Authorize.Net Direct Post
Authorize.Net Direct Post is useful for Magento website that have a plenty of stores as merchants who can totally manage their checkout pages. Particularly, merchants have the own accounts on Authorize.Net and they will complete all checkout content and forms on their sites. In fact, this will bring more security for merchant payment information as the form is posted to Authorize.Net’s secure servers. It is clearly visible that Authorize.Net Direct Post plays the role of third-party in Magento site, the same as PayPal. However, with Authorize.Net, customers can finish the transaction process while remaining in the Magento store, instead of being redirected to the third-party website.
3 Steps to Configure Authorize.Net Direct Post in Magento 2
- Step 1: Prepare for the Authorize.Net Direct Post Method
- Step 2: Set the basement
- Step 3: Complete the last configuration
Step 1: Prepare for Authorize.Net Direct Post Method
This step is about preparing the appearance of Authorize.Net Direct Post payment method to display on your checkout page. Let’s follow the instruction below.
- On the Admin sidebar, click
Stores > Settings > Configuration. - In the panel on the left, choose
Sales > Payment Methods. - Click to expand the
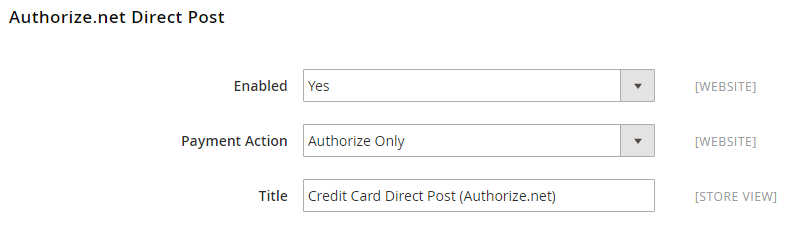
Authorize.Net Direct Postsection and set options.- In the
Enabledfield, setYesto activate Authorize.Net Direct Post. - In the
Set Payment Actionfield, selectAuthorize Onlyto accept Authorize.Net to authorize customer’s funds, and create an order in your store. After the process, you can compose an invoice and capture the customer’s funds. Or selectAuthorize and Captureto let Authorize.Net authorize and capture customer’s funds and creates an order and invoice in your store. - In the
Titlefield, enter a new name for Authorize.Net Direct Post to show on the checkout page or leave the default of “Credit Card Direct Post (Authorize.net)”.
- In the
Step 2: Set the basement
Before launching the Authorize.Net Direct Post Method for your Magento store you need to set the basement which actually is the process of providing your Authorize.Net merchant account.
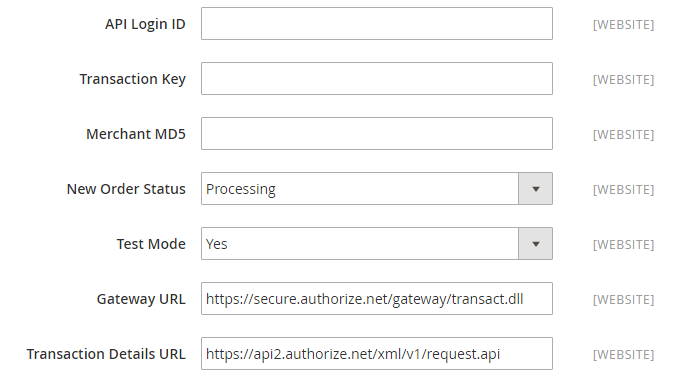
- In the
API Login ID,Transaction KeyandMerchant MD5fields, enter your credentials and hash value from your Authorize.Net merchant account. You can find hash value on the Authorize.Net website atAccount > Settings > Security Settings > MD5-Hash. - In the
New Order Statusfield, setProcessed Ogone PaymentorProcessingto be suitable with the nature of the transaction. - Leave the
Test Modefield toYesto set your configuration in the test environment. When you are sure that the system runs well and there is no bug, turnTest ModeintoNofor adapting on live transaction. - In the
Gateway URLandTransaction Details URLfields, type the new URLs or leave them in the default. In case you receive a temporary URL for test transactions, remember to restore the original URL when you are ready to process live transactions.
Step 3: Complete the last configuration
This is the last step of the guidance which concludes of the common requirement for configuring payment method in Magento.
- In the
Accepted Currencyfield, choose the currency being circulated in your location or use the one that gives your target customers the most convenience at checkout. - Set
DebugtoYesto save logs between your store and the Authorize.Net system. - Set
Email CustomertoYesif you want to send emails to customers then type your business email address in theMerchant’s Emailfield. - In the
Credit Card Typesbox, select all type of credit card that is accepted in your store. - Set
Credit Card VerificationtoYesto require customers to enter a card verification value. - In the
Payment from Applicable Countriesfield, chooseAll Allowed Countriesto accept Authorize.Net Direct Post for customers from all countries specified in your store configuration orSpecific Countriesto approve this payment method for some definite countries which you select from thePayment from Specific Countrieslist. - In the
Minimum Order TotalandMaximum Order Totalfields, set the order amounts required to qualify for this payment method. - In the
Sort Orderfield, enter a number to determine the position of Authorize.Net Direct Post in the list of payment methods that is shown during checkout (start from 0).

- Click the
Save Configbutton in the upper-right corner when you are done.
Explore Payment extensions collection by Mageplaza
The bottom line
We understand that every Magento 2 store needs more than one payment method to operate at its best and satisfy their customers. That is why this guide tries to provide you with the most detailed instructions to get started. If you are looking for more completed solutions, please take a look at the below payment extensions by Mageplaza, where we offer amazing tools for all common payment gateways. Any concerns about the guide or the extensions, please discuss more with us.

Looking for
Customization & Development Services?
8+ years of experiences in e-commerce & Magento has prepared us for any challenges, so that we can lead you to your success.
Get free consultant
Recent Tutorials

Change Store Email Addresses

Fix Magento 2 'Invalid Form Key. Please refresh the page'

Magento 2 Search Settings: Default Magento vs Mageplaza AJAX Search
Explore Our Products:
People also searched for
- magento 2 set default payment method
- magento payment methods
- google pay magento 2
- magento 2 payment methods
- payment methods magento 2
- magento secure payment bridge
- magento 2.3 payment methods
- magento 2 admin payment method
- payment methods in magento 2
- magento 2 default payment method
- magento payment options
- magento payment methods not saving
- magento payment bridge setup
- magento 2 payment set additional information
- magento payment
- magento payment bridge
- magento 2 credit card payment
- magento payment method
- magento credit card payment
- magento payment system
- payment method credit card magento
- no payment methods magento 2
- magento paypal direct payment
- magento 2 payment method
- magento payment action
- magento payments
- payment methods magento
- magento 2 google pay
- 2.3.x, 2.4.x
Stay in the know
Get special offers on the latest news from Mageplaza.
Earn $10 in reward now!


