
With a big catalog of 224+ extensions for your online store
How to Setup Facebook Pixel Remarketing on Magento 2
In the past, I was wrong to think that Facebook was not a viable tool for marketing campaigns. However, according to the analysis from Alexa, this is one of the social networks that bring in huge traffic for every business.
Hence, the biggest question that marketers and us have to pose is how to use it as a tool to boost sales and increase conversion rates for your business. The average shopping cart abandonment rate is approximately 78%.
One of the best and most effective ways is to implement a Facebook remarketing campaign for your Magento 2 store. This way will help you achieve your goal.
In this tutorial, we will help you understand how to configure Facebook Remarketing on Magento 2.
Some related posts:
- How to setup Google Adwords conversion tracking
- How to setup Google Universal Analytics
- How to Setup Facebook Livechat in Magento 2
- Top Facebook Comments extension for Magento 2
- How to integrate Facebook with Magento
- Magento 2 Facebook Login Extension
- How to Add Facebook Social Widget without extension
- How to Add Google Tag Manager to Magento 2
How to configure Facebook Remarketing on Magento 2
Google Tag Manager for Magento 2
Easily monitor store stats and adjust marketing tags and snippets with simple source code
Check it out!To configure Facebook Remarketing:
- Step 1: Install Mageplaza GTM
- Step 2: Create Pixel Facebook
- Step 3: Connect your pixel to your GTM account
- Step 4: Add your tags and Post your changes
Step 1: Install Mageplaza GTM
- Download Magento 2 Google Tag Manager module, follow this guide to use Google Tag Manager
Get Container ID for setting Magento
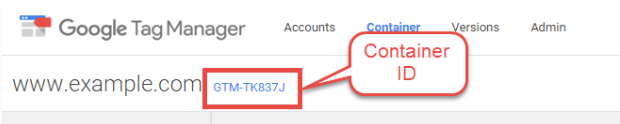
Setup in Magento
Login to Magento Admin > Mageplaza > Google Tag Manager > Settings
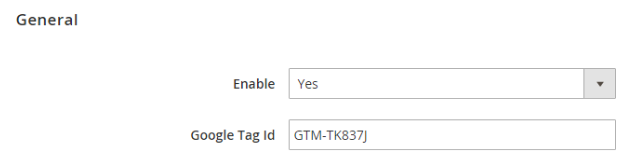
- Choose Yes to enable the module.
- Enter Container ID from Google into Google Tag ID field.
Step 2: Create Pixel Facebook
- Go to the
Pixeltab in the GTM - Click
Create Pixel - Name the pixel. You only have one pixel per account, so choose a representative name for your business.
- Check the box to accept the terms
- Click
Create pixel
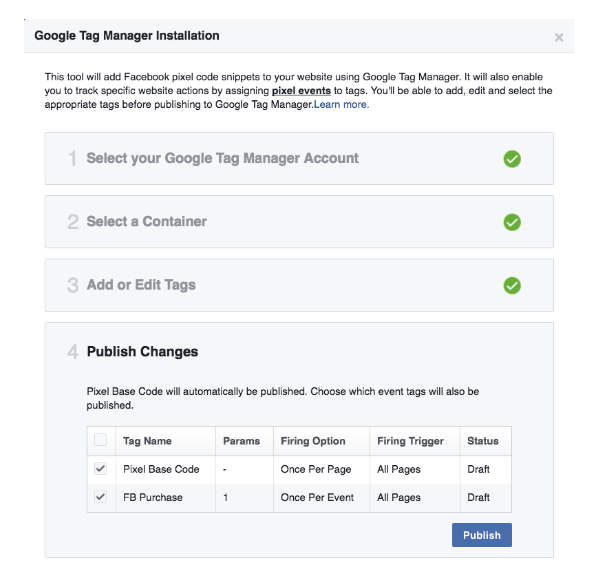
Step 3: Connect your pixel to your GTM account
First of all, you need to get your pixel’s base code here.
- Go to the
Pixeltab - Select
Setup pixel - Choose
Use an Integration or Tag Manager - Then, choose
Google Tag Manager - Select
Quick Install - Select Google account associated with your Google Tag Manager account
- Click on your account name. If you do not see the appropriate account in the list, you will need to create a new account in Google Tag Manager
- Click the container name you want to use for your Facebook pixel tag. If the desired container is not in the list, you need to create a new container in Google Tag Manager
Step 4: Add your tags and Post your changes
- Check the boxes next to the tags you want to post. The pixel tag will be added by default. You should post this tag to complete pixel settings on your site.
- Click
Post

Looking for
Customization & Development Services?
8+ years of experiences in e-commerce & Magento has prepared us for any challenges, so that we can lead you to your success.
Get free consultant
Recent Tutorials

Change Store Email Addresses

Fix Magento 2 'Invalid Form Key. Please refresh the page'

Magento 2 Search Settings: Default Magento vs Mageplaza AJAX Search
Explore Our Products:
People also searched for
- magento 2 facebook pixel
- facebook pixel magento 2
- facebook pixel for magento 2
- facebook pixel magento2
- add facebook pixel to magento 2
- magento2 facebook pixel
- install facebook pixel magento 2
- magento 2 facebook pixel extension
- pixel facebook magento 2
- magento facebook pixel
- facebook pixel magento
- facebook magento 2
- add facebook pixel magento 2
- listrak magento 2
- facebook remarketing pixel
- facebook pixel tutorial
- magento pixel facebook
- pixel facebook magento
- facebook pixel login
- facebook remarketing pixel google tag manager
- facebook pixel extension
- magento 2 remarketing
- magento 2 remarketing extension
- facebook conversion pixel magento
- facebook pixel magento 1
- facebook remarketing
- magento facebook marketing
- facebook remarketing tutorial
- magento 1 facebook pixel
- facebook remarketing tag
- 2.3.x, 2.4.x
Stay in the know
Get special offers on the latest news from Mageplaza.
Earn $10 in reward now!


